Cutora
Setup guide · v1.1.10 of 12 steps done
Setup guide · Version 1.1.1

Your own video editor for Android and iPhone.

Your users cut clips, add text, stickers, music and voice-overs, and export up to 4K – right on their phone. This guide takes you from the download to your own branded app in Google Play and the App Store, in twelve steps.

First run
≈ 45 min
Server or Firebase
Not needed
Platforms
Android · iOS

Everything happens on the phone

Preview and export use the phone's own video engine – Media3 on Android, AVFoundation on iPhone. There is no server, no user account and no FFmpeg. You host nothing, you pay nothing per user, and the editor works offline. Projects stay on the user's phone.

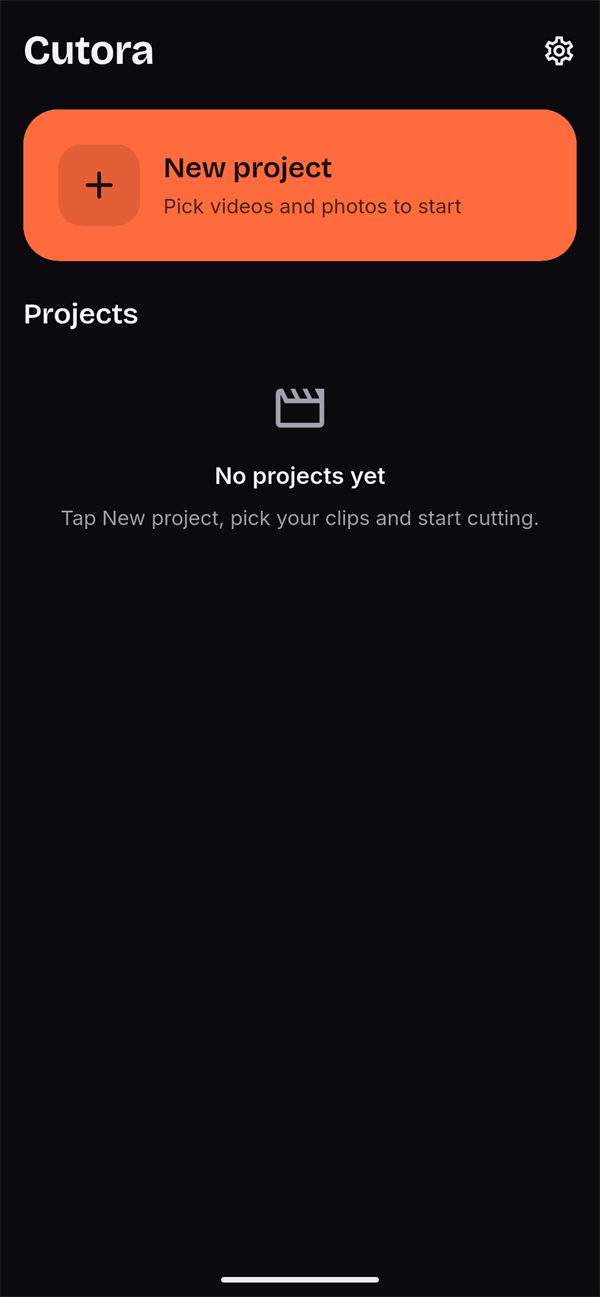
Home screen with the New project card
Start a project from the gallery.
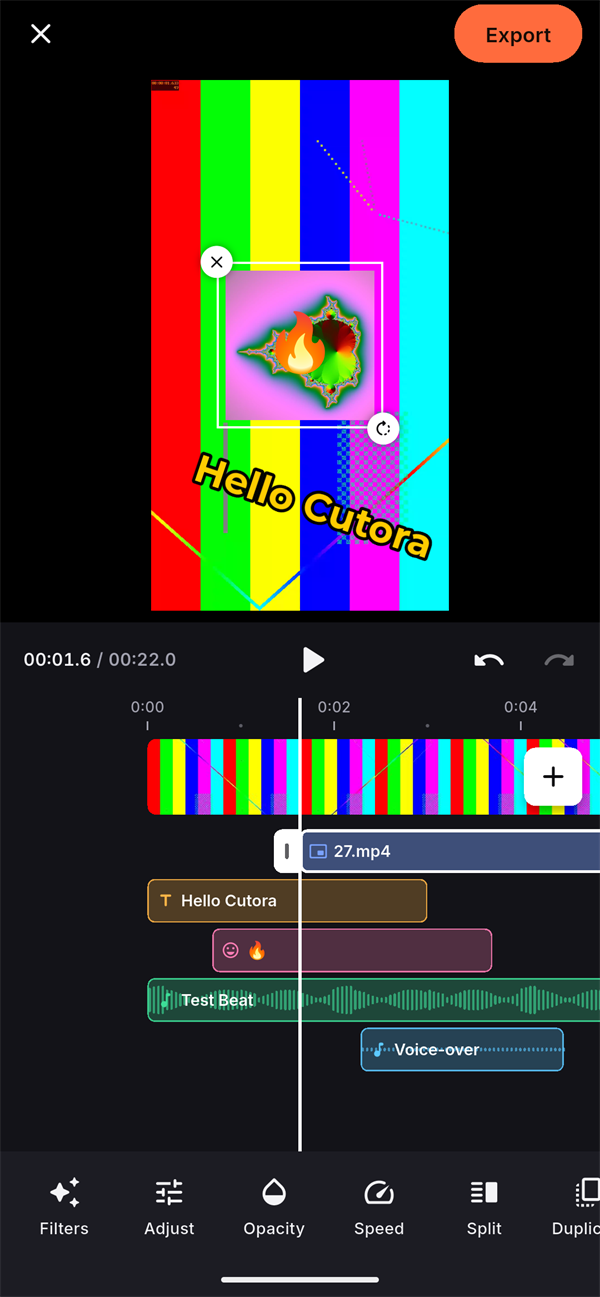
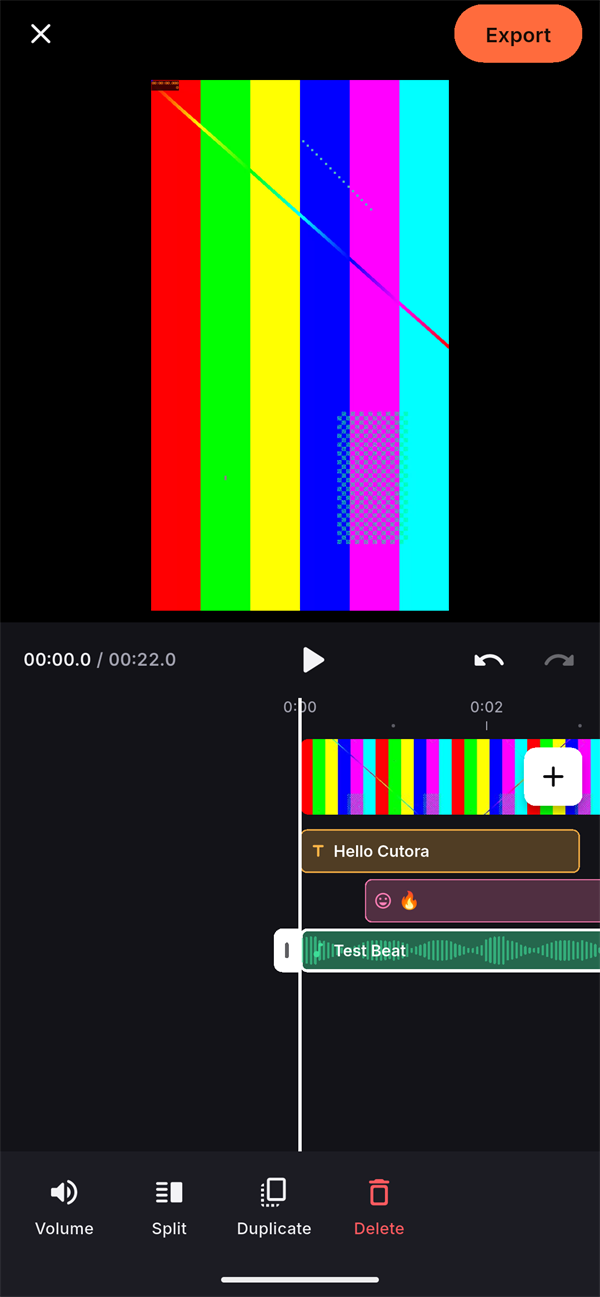
Editor with video, overlay, text, sticker, music and voice-over tracks
Clips, overlay, text, sticker, music and voice on one timeline.
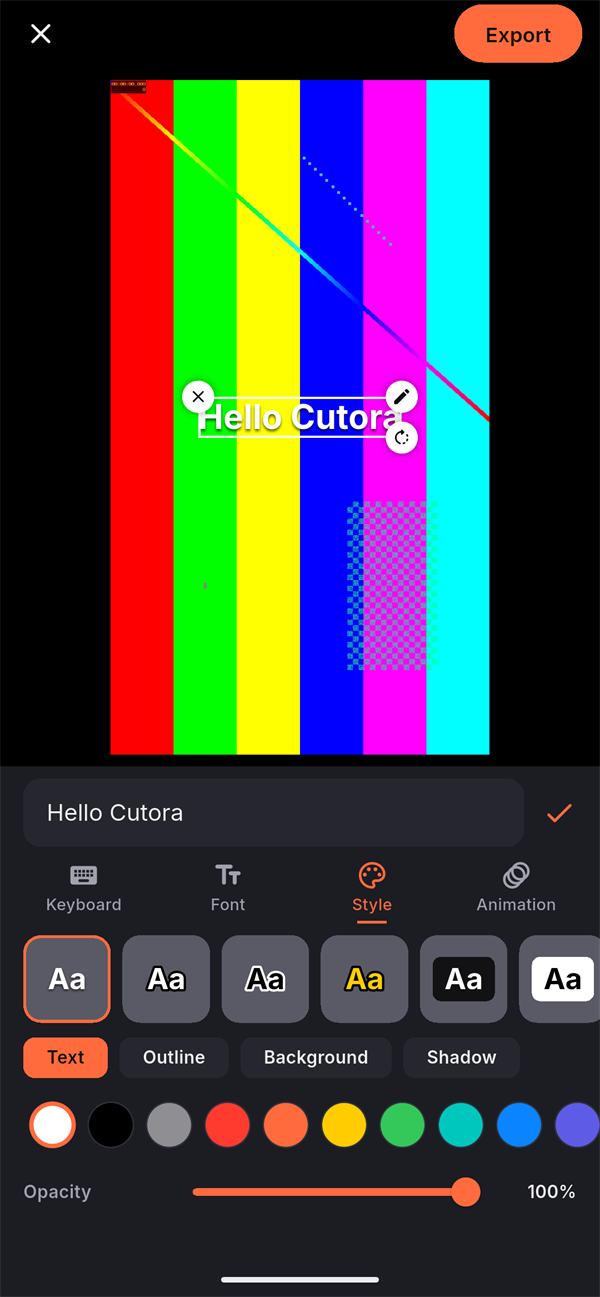
Text styles with colours, outline, background and shadow
Text with ready-made styles.
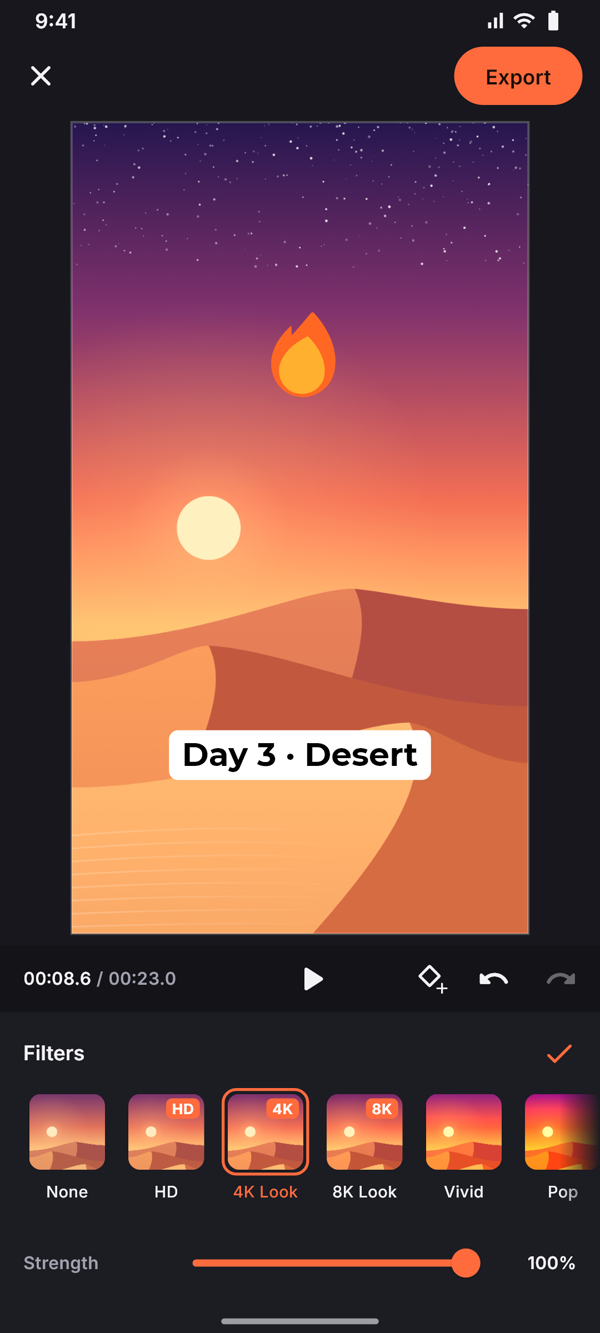
Filters panel with the crisp HD, 4K and 8K looks first, 4K Look selected, and a strength slider
Filters, with crisp HD, 4K and 8K looks.

In the download

FolderWhat's inside
Documentation/This guide. It works offline – open index.html in any browser.
Cutora/The Flutter project: the app's source code, tests, the rebrand script, the icon sources and THIRD-PARTY-LICENSES.txt. This is the folder you open in step 3.
README.txtThe short version of this page.

You need

  • A computer with Windows, macOS or Linux. For the iPhone version you also need a Mac with Xcode – or a cloud Mac service (step 12).
  • An Android phone and a USB cable. The emulator in Android Studio is fine for most things, but test exports on a real phone.
  • For iOS: an iPhone and an Apple ID. Testing on your own iPhone is free.
  • To publish: a Google Play developer account (one-time fee, $25 at the time of writing) and the Apple Developer Program ($99 per year).
  • The unzipped download. Put the folder Cutora into a short path without spaces, for example a folder called dev right on your drive (Windows) or in your home folder (Mac). On Windows, very deep folders can stop the build (see Troubleshooting).

Requirements

PartVersion
Flutter3.47.0 or newer (stable channel). Dart 3.13.4 or newer comes with it.
AndroidPhones with Android 7.0 (API level 24) or newer. Builds use Android SDK 36 and NDK 28.2 (step 2).
iOSiPhone with iOS 15.5 or newer (iPads run it in iPhone mode). Built on a Mac with the current Xcode and CocoaPods.
EditorAndroid Studio or VS Code, each with the Flutter plugin.
Server, Firebase, accountsNone.
What's inside

Features

All of this works in the app as delivered, on Android and iOS, in all 15 languages.

AreaWhat your users can do
ProjectsStart from videos and photos in the gallery (up to 100 at once) – or share them into the app: in the gallery, Photos or any other app choose videos and photos, tap Share and pick the app, and a new project with them opens in the editor (Android and iPhone). Projects save themselves after every change and get a cover picture. Rename, duplicate or delete them on the home screen. Share as file packs a whole project – its media included – into one .cutora file (a backup, or to go on editing on another phone); the file button on the home screen opens such a file as a new project. No server or account is involved. The ending is projectFileExtension in lib/config/app_config.dart. Camera records a video with the phone's camera app and adds it at the end.
TimelineThumbnails and waveforms, pinch to zoom, undo and redo (100 steps). Split, trim, duplicate and delete clips – Delete sits next to Split, and after a split the part under the playhead is selected, so it goes with one more tap. Reorder by holding a clip: the clips line up as small squares and the held one goes where the finger lets go. + adds new clips at the end. Dragging an item or a trim handle to the edge of the screen scrolls the timeline along. Rotate a clip by a quarter turn, let it fill the frame or fit it again, and freeze a frame: a three-second still of the frame at the playhead goes into the video. A magnet: a moved or trimmed item snaps onto clip edges, other items, marked beats and the playhead, with a light tick. Replace puts another video or photo into a clip and keeps its edits; Flip mirrors a video or photo; Reverse plays up to 30 seconds of a video backwards (its frames are put together again in reverse order on the phone, its sound becomes a reversed sound item). Cut pauses takes the quiet stretches out of a talking video in one step (jump cuts): the phone finds pauses of at least 0.6 seconds in the clip’s sound and leaves a little air around the words; one undo brings them back. Split scenes cuts a video wherever its picture suddenly changes (a new shot), so every shot becomes a clip of its own – handy for a long recording or a compilation.
Speed and soundSpeed from 0.1× to 100× (faster than 10× plays without sound). Speed curves – Hero, Bullet, Montage, Jump, Flash in and Flash out – cut a video into pieces at different speeds with in-between steps. Volume up to 100 %, fade in and fade out, mute.
Filters and colour30 filters with a strength slider: three crisp looks – HD, 4K Look and 8K Look – that sharpen the picture (an unsharp mask in the video engine and in the preview) and lift contrast and colour a little, then Vivid, Pop, Warm, Golden, Cool, Arctic, Fade, Film, Dream, Vintage, Sepia, Mono, Noir, Cinema, Sunset, Rose, Lush, Moody, Matte, Chrome, Bleach, Neon, Night, Autumn, Retro, Pastel and Silver; and 8 adjustments: brightness, contrast, saturation, exposure, warmth, tint, sharpness and fade. Apply to all gives every clip of the main track the filter and adjustments of the selected one; the transition panel has it too. Auto in Adjust measures a few frames of the clip and sets them for it: dark footage brighter, flat footage crisper, dull colours a little stronger and a colour cast evened out – gently, and good footage stays as it is. Put them on one clip – or as a filter item on its own timeline row: Filters, Adjust or Effects with nothing selected adds one at the playhead, its bar shows its name, and dragging its ends (or Whole video) makes it cover every clip and picture-in-picture clip under it, while texts and stickers stay as they are. Preview and export use the same colour maths and the same sharpening.
Video effects21 effects drawn by the video engine on Android, iOS and in the preview alike: Glitch, RGB split, VHS, Old film, Film grain, Vignette, Glow, Shake, Zoom pulse, Wave, Pixelate, Pixel pulse, Block glitch, TV static, Interference, CRT, Mirror, Kaleidoscope, Four screens, Strobe and Negative flash, each with a strength. They live on filter items (Effects), so they cover the clips and picture-in-picture clips under them and leave texts and stickers clean. The preview needs Impeller (the default on current Flutter); elsewhere it shows the picture without the effect, and the export still has it.
Transitions20 transitions between clips: dissolve, dip to black, dip to white, slide, push and wipe in four directions, zoom in, zoom out, open (from a vertical or a horizontal line) and box. From 0.1 to 2 seconds long.
Text22 fonts (Arabic included; Bebas Neue, Anton, Pacifico, Lobster, Bangers, Righteous, Lilita One, Kaushan Script and Shrikhand for titles), bold, italic and alignment, 20 ready-made styles, colour, outline, background, shadow and opacity, a Curve slider that bends a one-line text into an arch or a smile (left-to-right scripts; a caption with a highlighted word stays straight), 10 in and out animations – among them Typewriter: the letters come in one by one (and go again on the way out; a text with keyframes or a caption with a highlighted word shows in full). Move, rotate and resize with the fingers; the text snaps to the centre. Templates: 12 ready-made titles (font, colours and in/out animation in one tap). Read aloud speaks a text with one of the phone's own voices – in the language, at the speed (slow, normal, fast) and with the voice (deeper, normal, higher) chosen first – and puts it on the timeline as a voice-over.
Stickers236 emoji in 7 groups, always drawn in colour – in the preview and in the export – and 12 drawn shapes (a ring and a frame to point something out, arrows, an underline, speech and thought bubbles, a burst, a tick, a cross, a heart, a star), sharp at any size. Opacity, too. Animation, flip, split and duplicate.
Crop and masksCrop a video or photo in a crop view with a frame to drag – free, or 9:16, 16:9, 1:1, 4:5 and 4:3. Masks: split, mirror, circle, rectangle, heart and star, with a soft edge, rounded corners and invert; drag, pinch and turn the mask right on the picture. Preview and export match.
StabilizeSteadies shaky videos in three strengths (light, medium, strong). The app measures how the camera moved – on the phone, frame by frame – and moves a slightly zoomed window against the shake; it zooms only as far as the video needs. The preview plays the steadied result, and the export matches it. Also for picture-in-picture videos.
CaptionsAI-powered auto captions from what is said in the videos and voice-overs: on-device Whisper speech recognition (whisper.cpp) – on the phone, without internet and without any API key. The language is detected or chosen (17 offered, many more understood). The speech model (57 MB) downloads once, the first time. Captions are texts in four looks: edit, move or restyle them – one caption or all at once – make them again or remove them all with one tap. The word being said stands out as it is spoken (word timing from the speech recognition): in a colour, on a coloured box, or with a small pop, in seven colours – in the preview and in the exported video. The captions can be written in another language than the one spoken: English straight from the speech recognition, the other listed languages translated from it on the phone by Google ML Kit (each language model downloads once, about 30 MB; then it works offline); Song lyrics listens to the music too.
KeyframesVideos, photos, picture-in-picture clips, texts and stickers move, resize and turn over time: set a keyframe at the playhead (the ◆ button or the Keyframes tool), move the playhead, then drag or pinch the item – a new keyframe is made there, and in between the item travels linear or smooth. Diamonds on the timeline show every keyframe; tap one to jump there. Remove one or all. Texts, stickers and picture-in-picture clips also fade: with keyframes, Opacity sets how see-through the item is at the playhead, and it changes from keyframe to keyframe (without keyframes it sets the whole item). Splitting, trimming and speed changes keep the movement where it was. Preview and export match.
Clip animationsVideos and photos on the main track zoom or slide in and out (Animation); they are played as keyframes, so preview and export match. A clip with keyframes of its own keeps those.
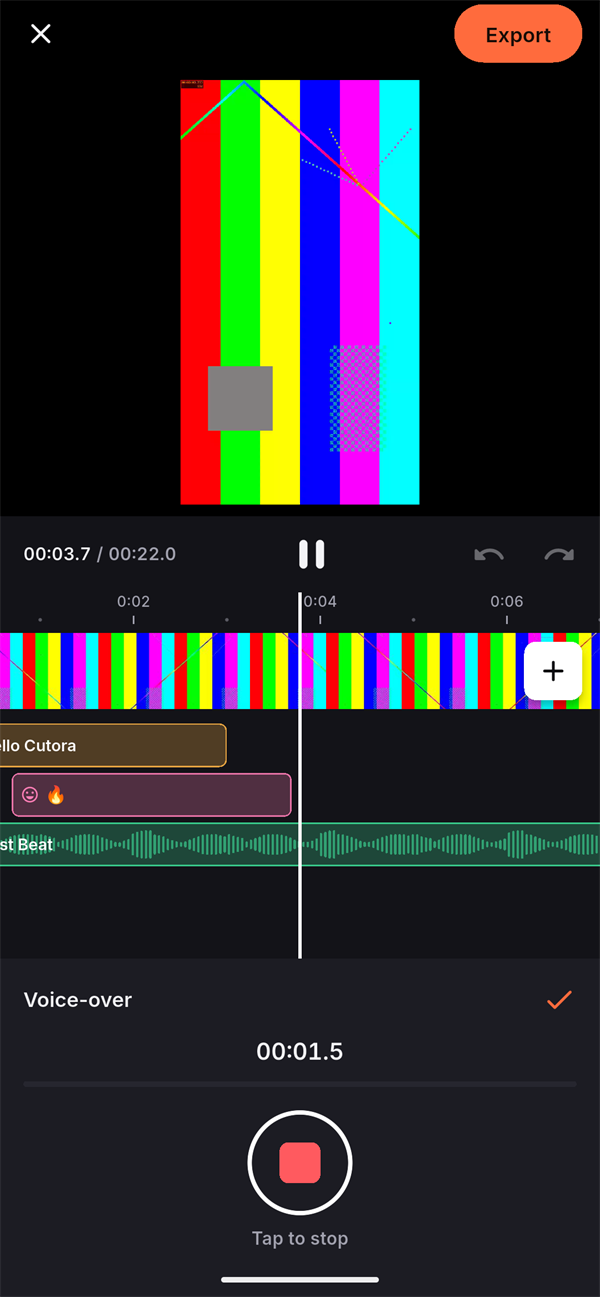
AudioMusic from audio files on the phone or from the music library (6 tracks made for the app by synthesis – chill, upbeat, cinematic, energetic, acoustic, ambient – free to use in any app built from it), 31 built-in sound effects (whooshes, riser, impact, glitch, bass drop, reverse cymbal, swipe, pop, click, bells, sparkle, success, error, drip, camera, boing, laser, coin, jump, power-up, slide whistle, drum roll, record scratch, typing, heartbeat, tick-tock and more – listen, then add at the playhead), voice-over recording from the playhead with a level meter and a teleprompter (a script that scrolls while you speak), and the sound of a clip extracted as its own track – or, with From video, the sound of any video on the phone (only its sound comes into the project, like music). Every sound has its own volume and fades. Reduce noise turns down hum, wind, fans and hiss. Voice effects – clear voice (rumble out, more presence, louder without clipping), chipmunk, deep, robot, echo, hall, megaphone, telephone, old radio, underwater and monster – are worked out on the phone. Loop plays a short song again and again until the video ends. Video sound off (in Audio) mutes every clip of the main track at once, for a video with music only; Even out volume measures the clips on the phone (pauses do not count) and brings the louder ones down to the quietest, so the video does not jump in volume. Beats marks the beats of a song (dots on its bar; the magnet snaps to them); then Cut to beats moves every cut between the clips onto the nearest beat in one step, so the pictures change with the music. Duration on a photo sets how long it shows (0.5–10 s, with Apply to all for every photo). Slideshow (start tools) makes the photos of the main track a slideshow in one tap: each shows for about 2.5 seconds with a slow zoom, in and out by turns, dissolving into the next – and on the beat when a song has marked beats. Ducking lowers music wherever speech plays.
Picture-in-pictureA second video or photo on top of the main video: move, rotate and zoom it, with its own filter, adjustments, opacity, speed and volume. Chroma key takes a green or blue screen out – or the colour the app finds in the clip – with strength, soft edge and tint removal, so the video below shows through. Collage: side by side, stacked, three rows or a 2×2 grid – each chosen video or photo fills its place as a picture-in-picture clip.
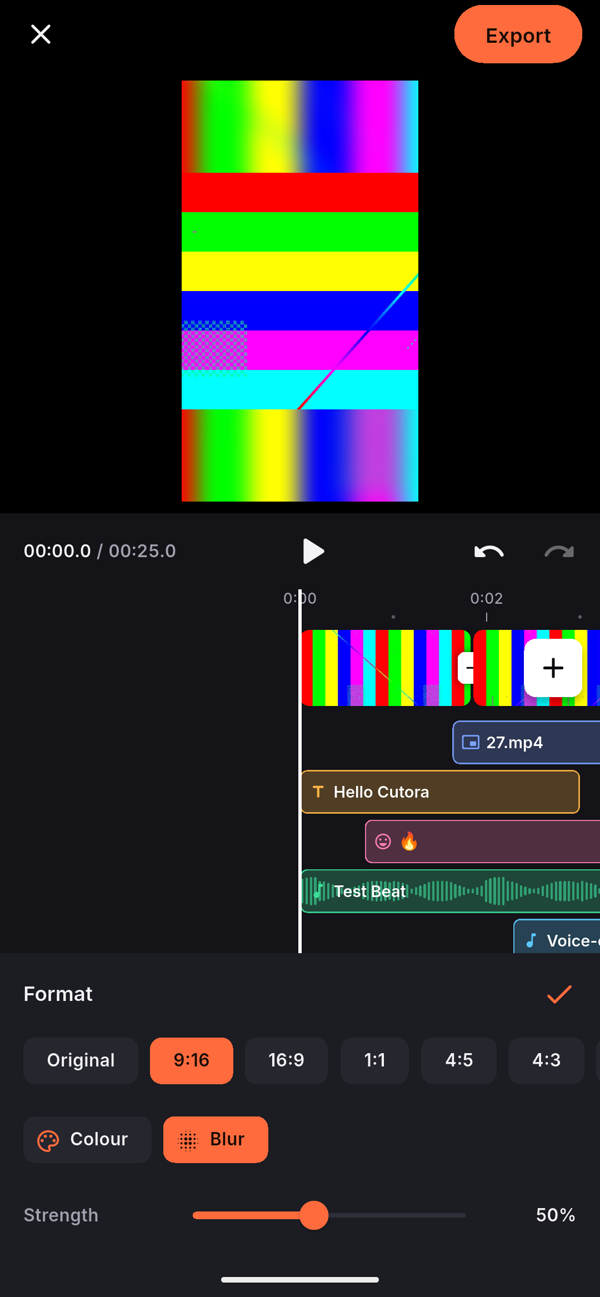
FormatOriginal, 9:16, 16:9, 1:1, 4:5, 4:3, 3:4 and 21:9. Each format shows a little frame of its shape, and the preview outlines the canvas while you choose. Where the clip leaves room – a landscape video in a 9:16 project, for example – the background is a colour, Blur or a photo of the user's: a blurred, enlarged copy of the clip, with a strength slider (10–100 %). Pinch the preview with two fingers to zoom the video into the frame. Preview and export look the same.
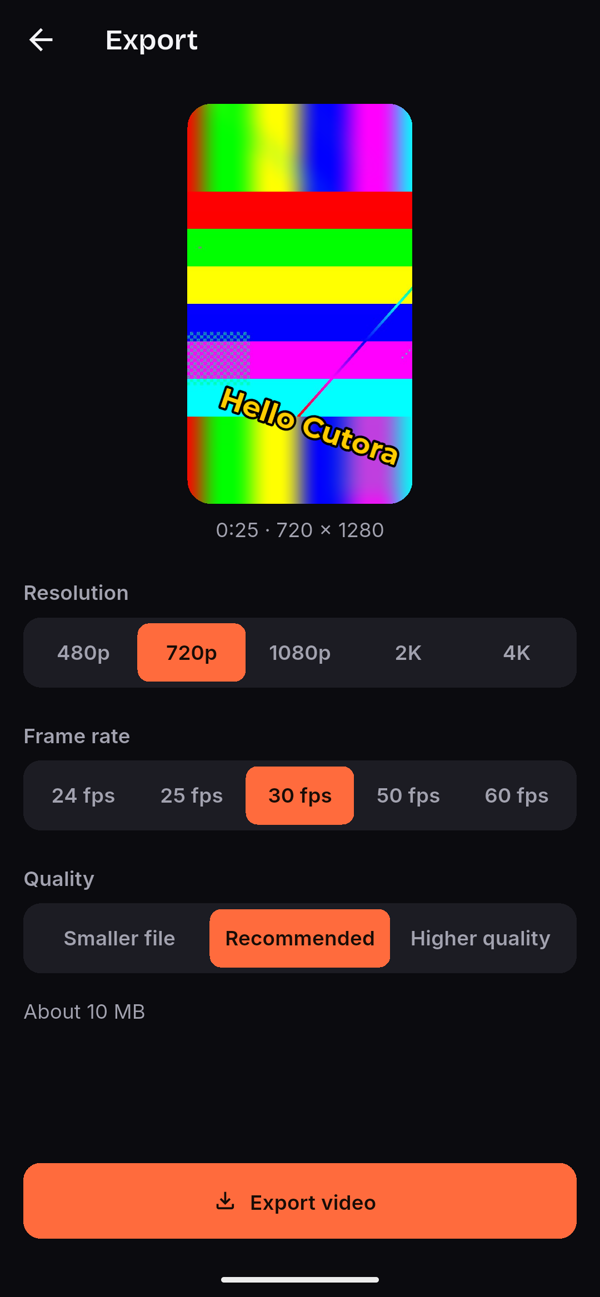
ExportA still of the video's first moment as it will look, texts and stickers included, with its length and pixel size. Below it one row each: resolution (480p, 720p, 1080p, 2K, 4K), frame rate (24, 25, 30, 50, 60 fps) and quality (three levels, with an estimated file size). The progress ring (with one decimal) and the finished tick appear on the still, with the time left; the export can be cancelled. The video is saved into an album named after your app; Share opens the phone's share sheet. 4K needs a phone that can encode it. Post to TikTok hands the video straight to the TikTok app on Android when it is installed (no TikTok account or key needed in the app); otherwise, and on the iPhone, the share sheet opens. Share as GIF makes a small animated GIF of the first eight seconds; Sound only shares the finished soundtrack as an M4A file.
AdsGoogle AdMob built in: a medium rectangle (marked “Ad”) under the export progress – the percentage stays in view the whole time – and a full-screen ad when the user leaves the finished video (never over the result), with Google's consent form for the EU and the UK. New users get the first 7 days without ads (you choose the number). Your ids in one file, or switched off – see Ads.
App15 languages: English, German, Arabic (right to left), Spanish, Portuguese, French, Italian, Turkish, Russian, Indonesian, Vietnamese, Hindi, Chinese (simplified), Japanese and Korean. Light, dark or automatic appearance – the editor itself always stays dark. Privacy policy, terms, support e-mail and open-source licenses in Settings.
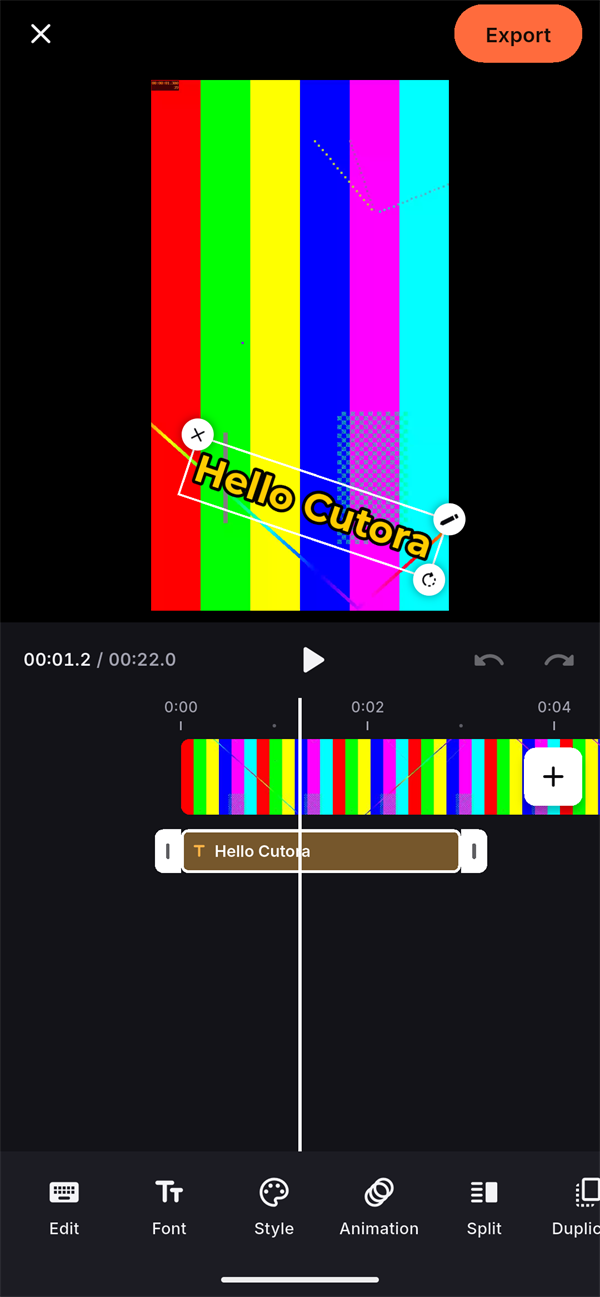
A rotated text with handles in the preview and its track on the timeline
Move, rotate and resize in the preview.
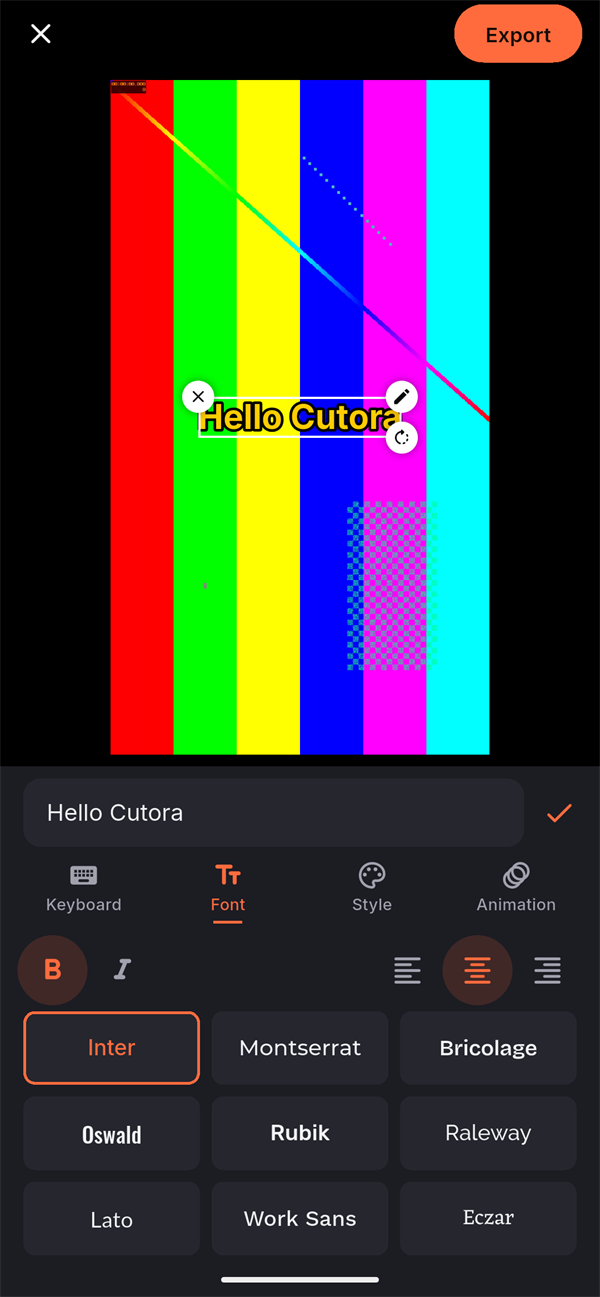
Font tab with bold, italic, alignment and font choices
13 fonts, bold, italic, alignment.
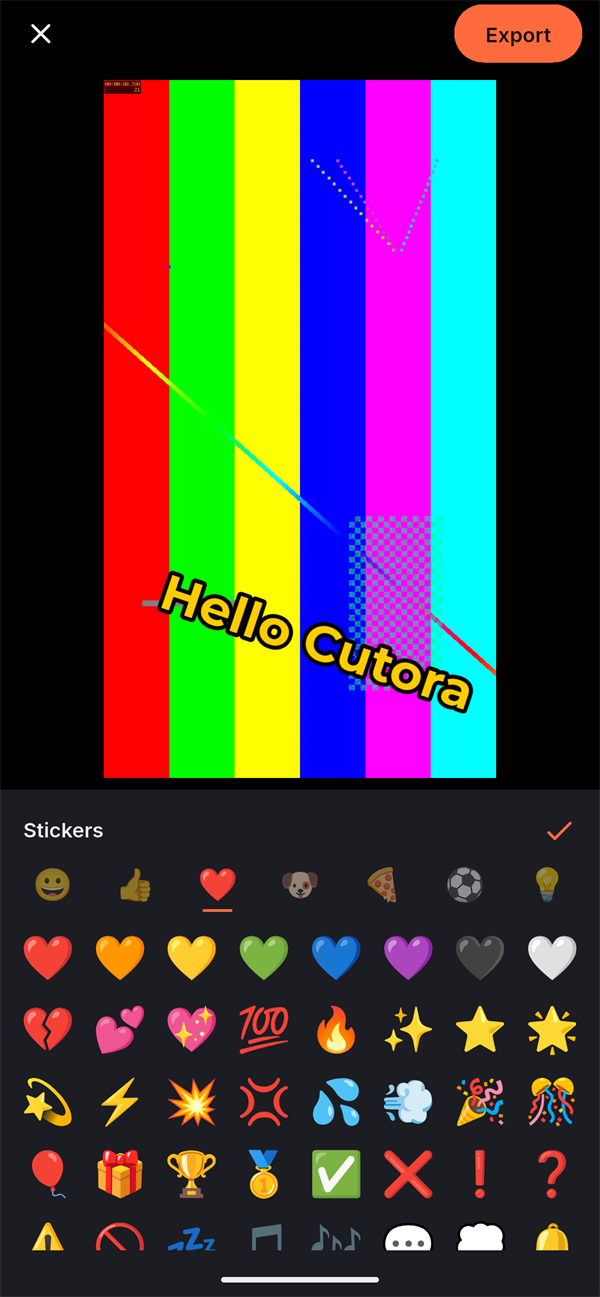
Sticker picker with emoji groups
236 emoji stickers in 7 groups.
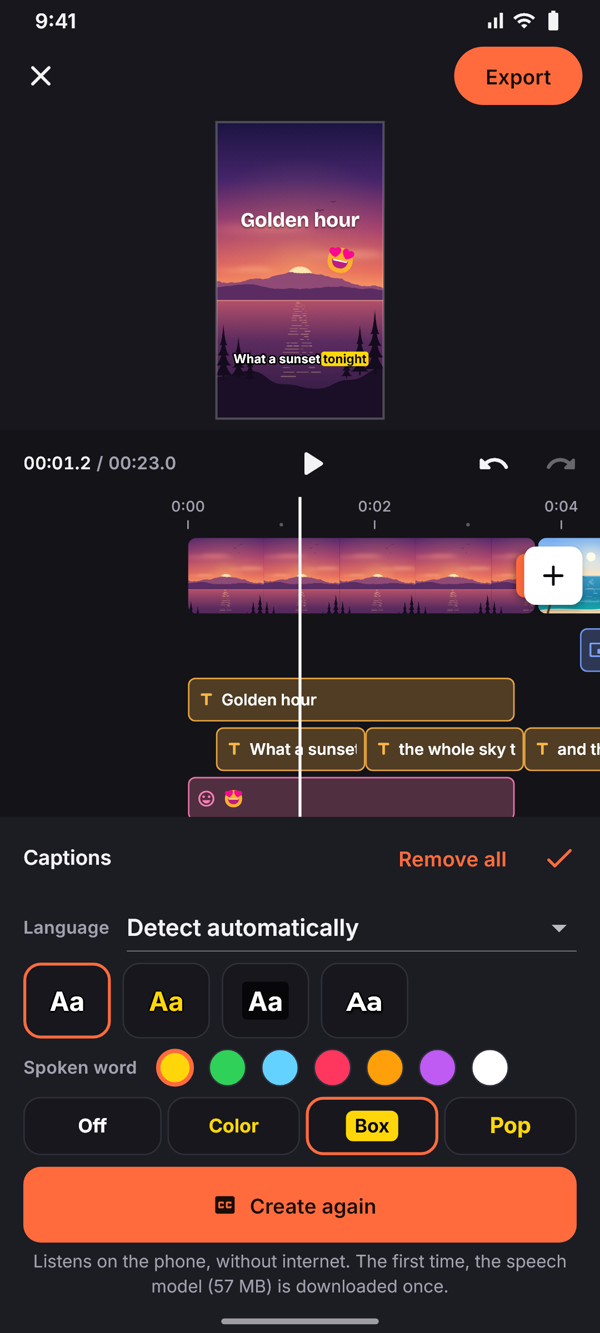
Auto captions in the preview, the word being said on a yellow box, and the captions panel with the Spoken word choices
Captions: the word being said stands out.
Music track with its waveform and the sound tools
Music with its waveform.
Voice-over panel while recording
Voice-over from the playhead.
Format with a blurred background and the Strength slider
Format › Blur
Export screen with the still, length and size, and the setting rows
Export screen
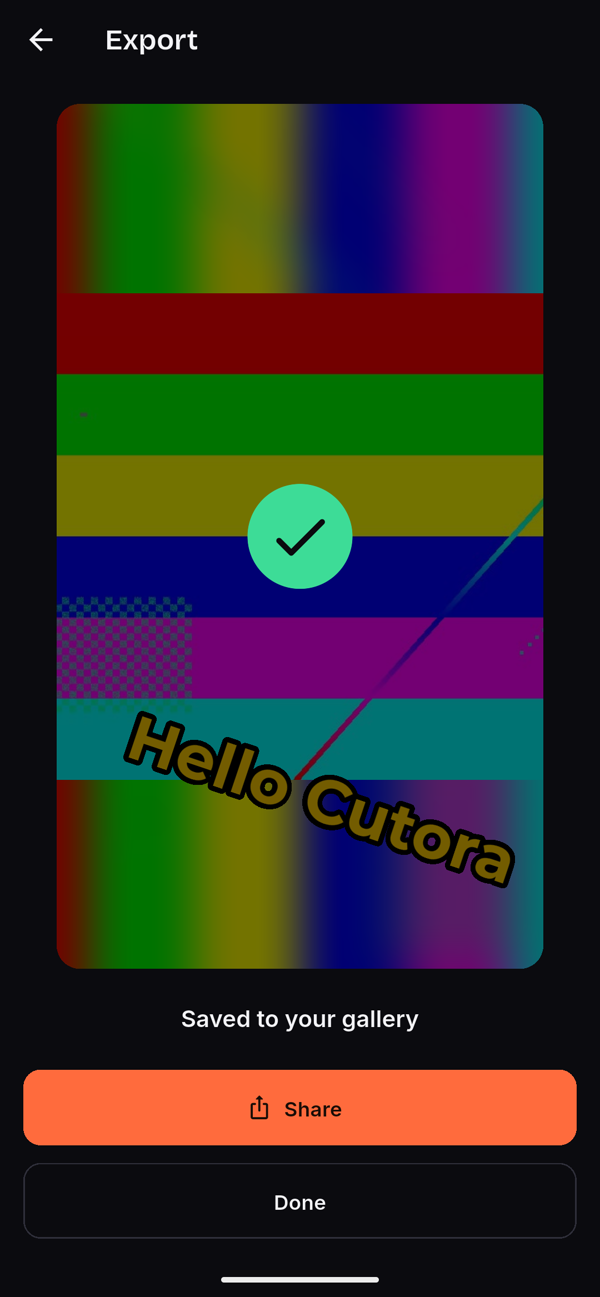
Export finished: the tick on the still, Share and Done
Export finished
Part A · ≈ 45 minutes, mostly downloads

Your computer

Install Flutter and Android Studio, then run the app on a phone. You do this only once.

1

Install Flutter

docs.flutter.dev · 10 min

Flutter turns the code into the Android and iOS app. Already installed? Run flutter upgrade if your version is older than 3.47.

  1. Open docs.flutter.dev/get-started/install, choose your system and Android as the target.
  2. Download the Flutter SDK (stable) and unzip it into a short folder path without spaces, for example into the same dev folder. On Windows, also install Git for Windows – Flutter needs it.
  3. Add Flutter's bin folder to your PATH.
    Windows: press Win, type environment variables and open Edit environment variables for your account. Select Path Edit New, paste the full path of the bin folder inside your Flutter folder (copy it from the address bar of File Explorer) and click OK.
    Mac: open Terminal and run this line once (it expects Flutter in the folder dev of your home folder – change the path if yours is somewhere else):
    echo 'export PATH="$HOME/dev/flutter/bin:$PATH"' >> ~/.zshrc
  4. Open a new terminal (Windows: press Win, type cmd, press Enter · Mac: Cmd + Space, type Terminal) and check the version:
    flutter --version

The first line says Flutter 3.47 or newer and channel stable.

2

Install Android Studio

developer.android.com/studio · 20 min

Android Studio brings the Android SDK, the emulator and the build tools.

  1. Download Android Studio from developer.android.com/studio and install it. On the first start choose the Standard setup and accept the licenses.
  2. On the welcome screen click Plugins, search for Flutter and click Install (the Dart plugin comes with it). Restart Android Studio.
  3. Click More Actions SDK Manager SDK Tools, tick Android SDK Command-line Tools (latest) and click Apply.
  4. In the terminal, accept the Android licenses (answer y). If it says this is no longer needed, that's fine too.
    flutter doctor --android-licenses
  5. Check everything:
    flutter doctor
    Lines for Chrome, Visual Studio or Linux desktop don't matter for this app. Xcode only appears on a Mac.

Flutter and Android toolchain show a green tick.

The first build stops at the NDK or “android-36”?

The project builds with Android SDK Platform 36 and NDK 28.2.13676358 – both are set in android/app/build.gradle.kts. Gradle normally downloads both during the first build in step 4. If that fails, install them yourself: SDK Manager SDK Platforms, tick the platform with API level 36 (Android 16); then SDK Tools, tick Show Package Details, open NDK (Side by side) and tick 28.2.13676358. Click Apply and build again.

3

Open the project

Android Studio · 5 min

  1. On the welcome screen click Open and choose the Cutora folder – the one that contains pubspec.yaml. Click Trust Project if Android Studio asks.
  2. Open the terminal inside Android Studio: View Tool Windows Terminal. It starts in the project folder. Load the packages:
    flutter pub get
    A note like 4 packages have newer versions incompatible with dependency constraints is normal: Flutter and other packages hold a few indirect packages back.

The terminal ends with Got dependencies!

Prefer VS Code?

Install the Flutter extension and open the folder with File Open Folder. Run the same commands in its terminal. Pick the device in the status bar at the bottom and press F5 to start the app.

4

Run it on a phone

Phone or emulator · 10 min

  1. Turn on USB debugging: on the phone open Settings About phone and tap Build number seven times. Then open Settings System Developer options and turn on USB debugging. Connect the phone and allow the computer. No phone at hand? In Android Studio open Device Manager, create a virtual device with a recent Android version and start it.
  2. Choose the phone in the device menu at the top of Android Studio and click the green Run button – or type:
    flutter run
  3. The first build downloads Gradle and the Android libraries. That takes several minutes; later builds are much faster.
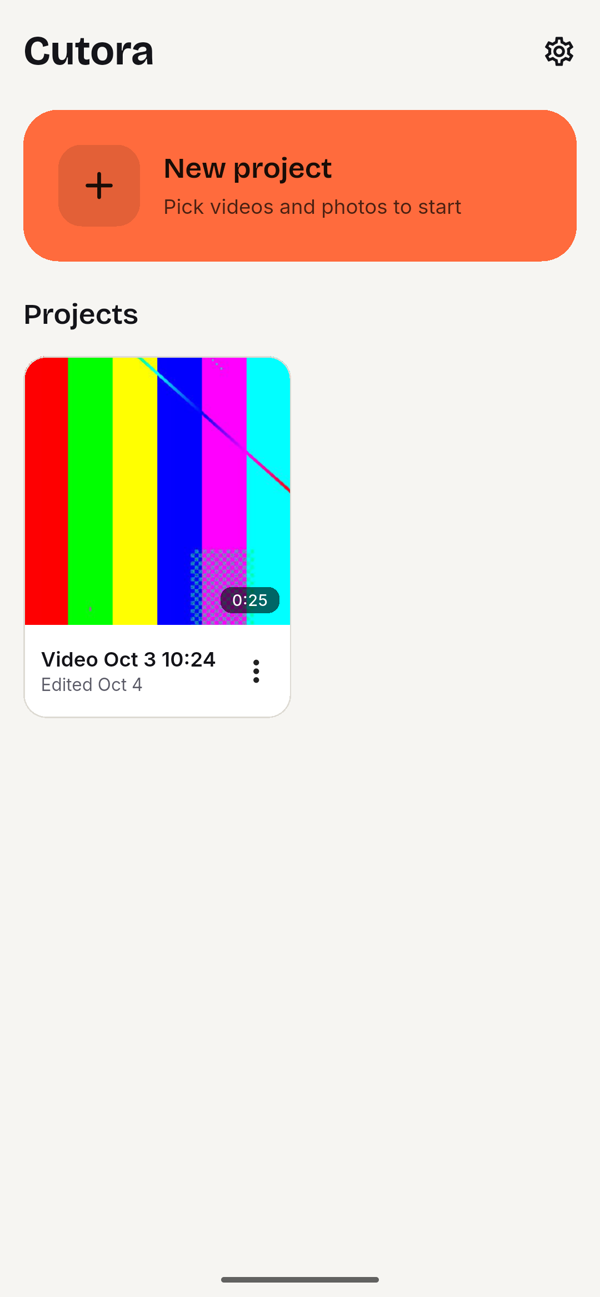
The app's home screen with the New project card
The home screen on the first start.

You see the home screen. Tap New project, pick two or three videos and try the editor.

Test exports on a real phone

Emulators have no hardware video encoder. Exports there are slow and can stop with a codec error. Real phones use their hardware encoder and are much faster.

Part B · ≈ 20 minutes

Make it yours

Name, ids, colours, links, icon and launch screen live in one file: branding/brand.yaml. One command copies them into the Android and iOS projects, so you never edit those files by hand.

5

Fill in the brand file

branding/brand.yaml · 5 min

  1. Open branding/brand.yaml in Android Studio or any text editor. Every value has a short comment above it.
  2. Change the values at the top. For an app called ClipGo it could look like this:
    app_name: ClipGo
    android_id: com.yourcompany.clipgo
    ios_bundle_id: com.yourcompany.clipgo
    accent_color: "#2EC4B6"
    on_accent_color: "#04201D"
    support_email: support@yourcompany.com
    privacy_url: https://yourcompany.com/privacy
    terms_url: https://yourcompany.com/terms
KeyWhat it is
app_nameName under the icon and in the app, and the album name for exported videos. About 12 characters fit under an icon. These characters aren't allowed: / \ : * ? " < > |
android_idYour app's id in Google Play (application ID): a lowercase reverse domain such as com.yourcompany.clipgo. It can't change after the first release.
ios_bundle_idYour app's id in the App Store, usually the same as android_id. Letters, digits, dots and hyphens – no underscores.
accent_colorButtons, selections and the playhead. Six hex digits in quotes: "#2EC4B6"
on_accent_colorText and icons on the accent colour. The script warns below a contrast of 4.5:1 and suggests a better colour.
support_emailShown under Settings › Contact support. Use an address you read.
privacy_url, terms_urlSettings › Privacy policy and Terms of use: pages on your website. Both stores require a privacy policy – the project writes both pages for you, see Legal pages.
icon, splashImages and background colours – step 6.

Choose the ids with care

Google Play knows your app by android_id forever, and the App Store by ios_bundle_id. Use a domain you own, written backwards. Google Play doesn't accept ids that start with com.example.

Colours go in quotes

In YAML an unquoted # starts a comment, so accent_color: #2EC4B6 would be empty. The script notices and tells you how to fix it.

6

Your icon and launch screen

branding/ · 10 min

Two ways: bring your own logo, or keep the cut mark in your colours.

Your own logo

Replace the five PNG files in branding/ with your own, in these sizes:

FileSizeUsed for
icon.png1024 × 1024iOS icons and Android 7 icons. No transparency.
icon_foreground.png1024 × 1024Android 8+ adaptive icon: your logo on transparent, inside the middle circle (61 % of the width). Phones cut the edges into their own shape.
icon_monochrome.png1024 × 1024Android 13+ themed icons: the same logo in one colour on transparent. Set android_monochrome: "" to turn themed icons off.
splash.png512 × 512Launch screen on iOS and Android 11 and older: your logo on transparent.
splash_android12.png1152 × 1152Android 12+ launch screen: logo inside the middle 768 px circle. Set android_12_image: "" to show the launcher icon instead.

icon.background_color fills the Android icon behind your logo; splash.background_color is the launch screen's background. The launch screen looks the same in light and dark mode.

Keep the cut mark in your colours

  1. Set accent_color and icon.background_color in branding/brand.yaml.
  2. Redraw the five images:
    flutter test tool/branding/render_icons_test.dart
    It runs as a test only because Flutter's test runner can draw images. It overwrites the five PNG files in branding/.
Launch screen: the cut mark on a dark background
The launch screen, shown while the app starts.
The app icon with its name on an Android phone
Your icon and app name on the phone.

Five PNG files in branding/, square and in the sizes above. The script checks them in the next step.

7

Run the rebrand script

Terminal · 2 min

  1. First a dry run. It shows every change and writes nothing:
    dart run tool/rebrand.dart --dry-run
  2. Read the list. Lines under Please check are hints – they don't stop the script. If a value is wrong, the script lists what to fix and ends with Nothing was changed.
  3. Apply it. The script writes the files and then generates the launcher icons and launch screens (about a minute):
    dart run tool/rebrand.dart
What you see – the dry run for ClipGo
Dry run from branding/brand.yaml

  App name        ClipGo
  Android id      com.yourcompany.clipgo
  iOS bundle id   com.yourcompany.clipgo
  Colours         accent #2EC4B6, text on accent #04201D
  Support         support@yourcompany.com
  Links           https://yourcompany.com/privacy  https://yourcompany.com/terms
  Ads             on, Google's test ids, none in the first 7 days

Project files
  changed     lib/config/brand.dart
                - appName: 'Cutora' -> 'ClipGo'
                - accentColor: 0xFF22D3EE -> 0xFF2EC4B6
                - onAccentColor: 0xFF04161A -> 0xFF04201D
                - supportEmail: 'support@example.com' -> 'support@yourcompany.com'
                - privacyUrl: 'https://example.com/privacy' -> 'https://yourcompany.com/privacy'
                - termsUrl: 'https://example.com/terms' -> 'https://yourcompany.com/terms'
  changed     android/app/build.gradle.kts
                - namespace: com.samidevstudio.cutora -> com.yourcompany.clipgo
                - applicationId: com.samidevstudio.cutora -> com.yourcompany.clipgo
  moved       android/app/src/main/kotlin/com/samidevstudio/cutora/MainActivity.kt
              to android/app/src/main/kotlin/com/yourcompany/clipgo/MainActivity.kt
                - package: com.samidevstudio.cutora -> com.yourcompany.clipgo
  changed     android/app/src/main/AndroidManifest.xml
                - android:label: Cutora -> ClipGo
  changed     ios/Runner/Info.plist
                - CFBundleDisplayName: Cutora -> ClipGo
                - CFBundleName: Cutora -> ClipGo
  changed     ios/ShareExtension/Info.plist
                - CFBundleDisplayName: Cutora -> ClipGo
  changed     ios/Runner.xcodeproj/project.pbxproj
                - PRODUCT_BUNDLE_IDENTIFIER: com.samidevstudio.cutora -> com.yourcompany.clipgo (3x)
                - PRODUCT_BUNDLE_IDENTIFIER: com.samidevstudio.cutora.RunnerTests -> com.yourcompany.clipgo.RunnerTests (3x)
                - PRODUCT_BUNDLE_IDENTIFIER: com.samidevstudio.cutora.ShareExtension -> com.yourcompany.clipgo.ShareExtension (3x)
  changed     ios/Runner/Runner.entitlements
                - app group: group.com.samidevstudio.cutora -> group.com.yourcompany.clipgo
  changed     ios/ShareExtension/ShareExtension.entitlements
                - app group: group.com.samidevstudio.cutora -> group.com.yourcompany.clipgo
  changed     codemagic.yaml
                - bundle_identifier: com.samidevstudio.cutora -> com.yourcompany.clipgo
                - BUNDLE_ID: com.samidevstudio.cutora -> com.yourcompany.clipgo
  up to date  flutter_launcher_icons.yaml
  up to date  flutter_native_splash.yaml

Then the launcher icons and the launch screen would be generated again.

Please check
  - ads still use Google's test ids: the app shows "Test Ad" and earns nothing. Put your AdMob ids into the ads: section before you publish (or set enabled: false for no ads).

Dry run: nothing was written.
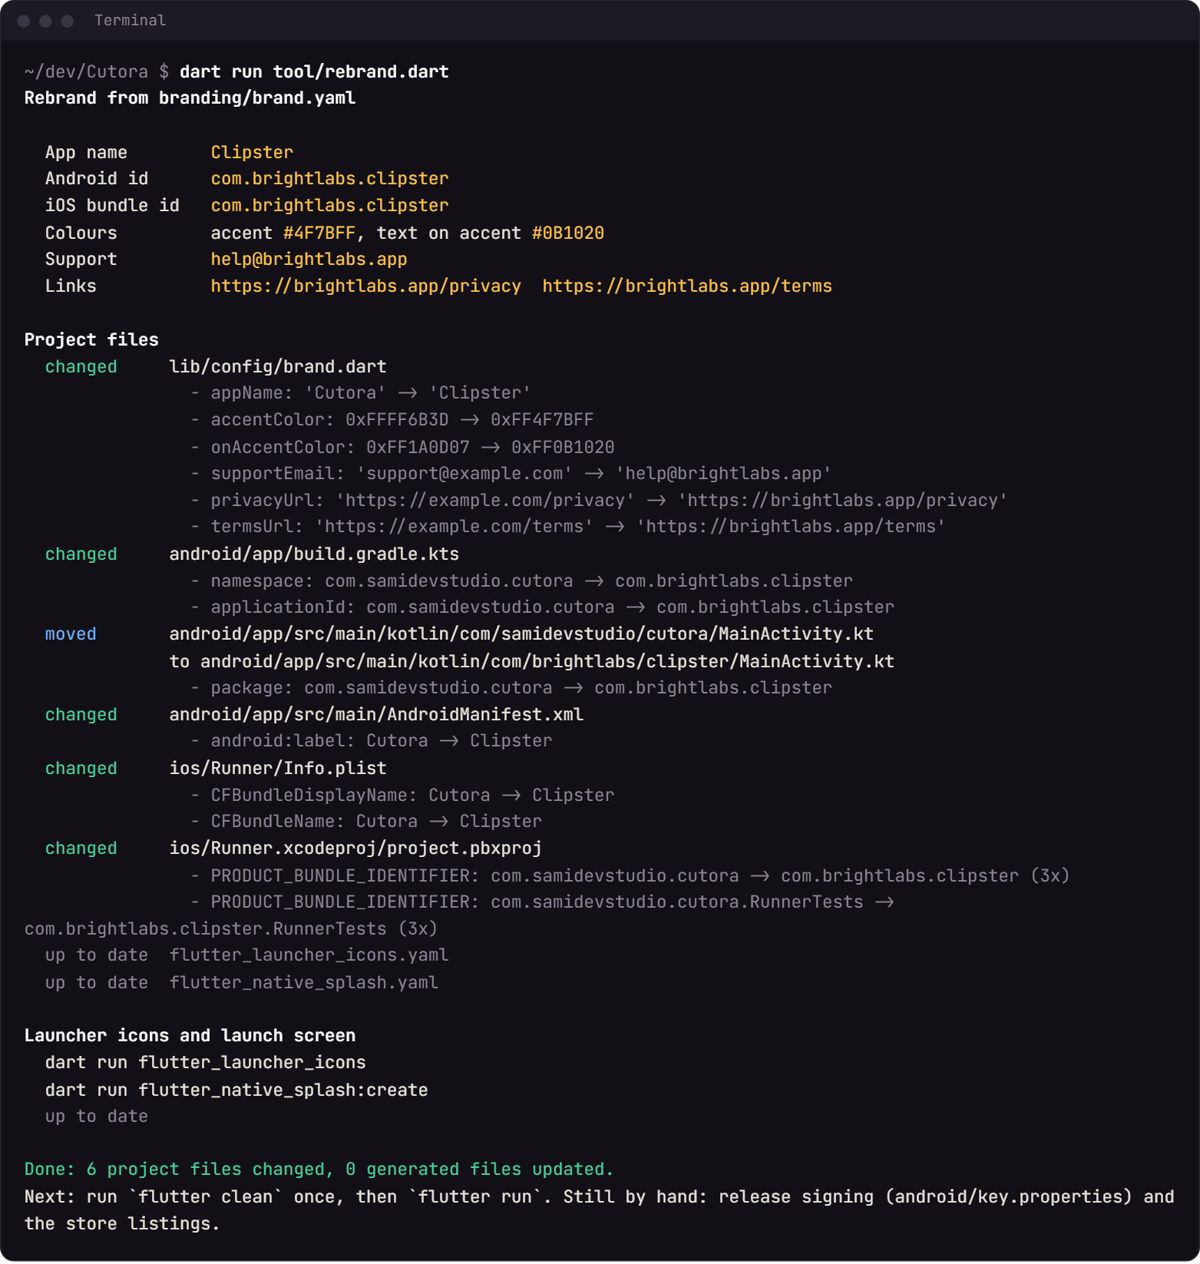
Terminal output of the rebrand script
Terminal: the rebrand script

The real run ends with Done: … project files changed, … generated files updated. Run it again and it says Everything already matches the brand file.

OptionWhat it does
--dry-runShows what would change; writes nothing.
--config <file>Uses another brand file, for example one per client: --config branding/client-a.yaml
--skip-iconsLeaves the launcher icons and launch screen alone.
--helpShows the options.

Always use the script for icons

Don't run flutter_launcher_icons or flutter_native_splash on their own. The icon generator changes an Xcode setting it shouldn't touch (ASSETCATALOG_COMPILER_GENERATE_SWIFT_ASSET_SYMBOL_EXTENSIONS); the rebrand script runs both generators and puts the setting back.

8

Check the result

Phone · 5 min

  1. The ids changed, so clean the build once and run the app again:
    flutter clean
    flutter run
  2. With a new id the app installs next to the old one. Delete the old Cutora from the phone. Still the old icon? Launchers cache icons – uninstall and install again. On an iPhone an old launch screen goes away after deleting the app and restarting the phone.

Your name under the icon, your colour on the New project card, your e-mail under Settings › Contact support.

What the script changed

FileWhat changes
lib/config/brand.dartGenerated: app name, colours, support e-mail, privacy and terms links.
android/app/build.gradle.ktsapplicationId and namespace.
android/app/src/main/kotlin/…/MainActivity.ktThe package line. The file moves to the folder of the new id.
android/app/src/main/AndroidManifest.xmlandroid:label, the name under the icon.
ios/Runner/Info.plistCFBundleDisplayName and CFBundleName.
ios/Runner.xcodeproj/project.pbxprojPRODUCT_BUNDLE_IDENTIFIER of the app, its tests and its share extension (<bundle id>.ShareExtension).
ios/ShareExtension/Info.plist, ios/Runner/Runner.entitlements, ios/ShareExtension/ShareExtension.entitlementsThe name in the iPhone's share menu, and the app group group.<bundle id> through which the share extension hands shared files to the app.
flutter_launcher_icons.yaml, flutter_native_splash.yamlImage paths and colours. Then both generators write the icons and launch screens into android/ and ios/.

What stays by hand

  • Release signing for Android (step 9) and your Apple team in Xcode (step 11).
  • The store listings: texts, screenshots, privacy policy page.
  • The script also reminds you of Firebase files. They only matter if you add Firebase later – the app as delivered has none. Signing keys and Firebase files are never opened or changed by the script.
  • The Dart package name stays cutora (you see it in imports like package:cutora/…). Users never see it, so there's no need to rename it.
Part C · ≈ 1 hour, plus store review

Publish

Android from any computer, iOS from a Mac. The store pages themselves – texts, screenshots, questionnaires – are filled in on the store websites.

9

Create your upload key

Terminal · 10 min

Google Play accepts only app bundles signed with your own key. You create it once and need it for every update.

  1. Open a terminal in the project's android folder (in Android Studio: Terminal, then cd android) and create the key file there. The command is the same on Windows, macOS and Linux:
    keytool -genkey -v -keystore upload-keystore.jks -storetype JKS -keyalg RSA -keysize 2048 -validity 10000 -alias upload
    keytool asks for a password and a few details (name, organisation). The password stays invisible while you type. keytool not found? Android Studio has its own: it is in the folder jbr/bin of your Android Studio installation (on a Mac inside the app: Show Package Contents › Contents/jbr/Contents/Home/bin).
  2. Create the file android/key.properties next to the key file, with your password:
    storePassword=your password
    keyPassword=your password
    keyAlias=upload
    storeFile=../upload-keystore.jks
    Gradle reads storeFile from the folder android/app, so ../upload-keystore.jks is the key in the android folder. Keep it somewhere else if you like – then write the full path of the file there.
  3. That's all. android/app/build.gradle.kts already reads key.properties: release builds are signed with your upload key when the file is there, and with the debug key when it isn't (so flutter run --release works on any computer).

Keep the key safe – and private

Back up android/upload-keystore.jks and its password, for example in a password manager. Never put them into a public repository or a ZIP you share. The project's .gitignore already keeps key.properties, *.jks and *.keystore out of Git. If you lose the upload key, Google Play can reset it for you (Play App Signing).

10

Build for Google Play

Terminal + Play Console · 15 min

  1. Set the version in pubspec.yaml. 1.0.0 is the version users see; the number after + is the build number. Raise the build number for every upload.
    version: 1.0.0+1
  2. Build the app bundle:
    flutter build appbundle
    The file is build/app/outputs/bundle/release/app-release.aab. For testers without Google Play, flutter build apk --release makes an APK you can send directly.
  3. Before the first upload, try the release build on your phone (connected by USB):
    flutter run --release
    Release builds are shrunk and optimized, so they can behave differently from flutter run. If the app closes right at the start, see Troubleshooting.
  4. In the Play Console click Create app and work through the setup tasks on the dashboard: privacy policy, app access, ads (Yes, my app contains ads – unless you switched them off, see Ads), content rating, target audience and data safety (see Permissions & stores).
  5. Upload the .aab as an internal testing release first, install it from the test link and try it. Then release it to production. New personal developer accounts may have to run a closed test with a group of testers before production. The Play Console dashboard shows what your account needs.

The release shows your app name and version, and Google Play accepts the bundle.

11

Run it on an iPhone

Mac + Xcode · 15 min

iOS apps are built on a Mac. No Mac? The box at the end of step 12 shows another way.

  1. Install Xcode from the Mac App Store and open it once, so it installs its components. Install Flutter on the Mac too (step 1), and CocoaPods:
    brew install cocoapods
    No Homebrew? sudo gem install cocoapods works too. See the box below for why it is needed.
  2. Bring the project with your changes to the Mac – through Git, or as a copy. Before copying, run flutter clean on your PC, so no build files with Windows paths come along. Then, in Terminal on the Mac, in the project folder, load the packages – this also prepares the iOS project:
    flutter pub get
  3. Open the workspace – not the .xcodeproj:
    open ios/Runner.xcworkspace
  4. In Xcode click Runner at the top of the left list, choose the target Runner and open Signing & Capabilities. Tick Automatically manage signing and choose your Team. No team in the list? Add your Apple ID under Xcode Settings Accounts. The Bundle Identifier shows your ios_bundle_id. Change it in branding/brand.yaml and run the rebrand script – not here. Do the same for the target ShareExtension (it puts the app into the share menu of Photos). Both use the capability App Groups with the group group.<your bundle id>; with automatic signing Xcode registers it for you.
  5. Connect your iPhone, tap Trust on the phone and turn on Settings Privacy & Security Developer Mode. Then run:
    flutter run

The app opens on your iPhone with your name and icon.

Swift Package Manager and CocoaPods

Most plugins come in through Swift Package Manager, Flutter's default way on iOS. The speech recognition package (packages/whisper_native, C and C++ code) comes in through CocoaPods: Flutter runs pod install with ios/Podfile by itself – CocoaPods only has to be installed.

12

Upload to the App Store

Mac + App Store Connect · 30 min

  1. In App Store Connect open Apps, click + New App and fill in the platform (iOS), the name, the primary language, your bundle ID and a SKU (any text for your own records). Xcode registered the bundle ID with your team in step 11.
  2. Build the upload file (the version comes from pubspec.yaml, step 10):
    flutter build ipa
    You get build/ios/archive/Runner.xcarchive and an .ipa in build/ios/ipa/.
  3. Upload it: drag the .ipa into Apple's Transporter app, or open the archive in Xcode (Window Organizer) and click Distribute App App Store Connect.
  4. After Apple has processed the build, test it with TestFlight. Then fill in the store page – screenshots, description, privacy policy URL, App Privacy – and submit it for review.

iPhone app

The project is an iPhone app; iPads run it in iPhone mode, so App Store Connect asks for iPhone screenshots only. To offer a real iPad app, add iPad in Xcode under Runner General Supported Destinations, try the app on an iPad, and add iPad screenshots.

No Mac? Codemagic

The cloud build service Codemagic builds on Mac machines, and the project brings its settings: codemagic.yaml with the workflows iPhone app to TestFlight and Device tests on the iPhone simulator. You still need the Apple Developer Program.

  1. Put the project into a private Git repository (GitHub, GitLab or Bitbucket) and add it in Codemagic as an app.
  2. In App Store Connect open Users and Access Integrations App Store Connect API and create a key with the role App Manager. Download the .p8 file (only possible once).
  3. In Codemagic open Team settings Integrations Developer Portal, add the key and give it a name. That name goes into codemagic.yaml after app_store_connect: (preset: codemagic_asc).
  4. In Apple Developer › Identifiers register the App Group group.<your bundle id> and two App IDs: your bundle ID and <your bundle id>.ShareExtension (the share extension). Turn on App Groups for both and choose that group.
  5. In Codemagic open Code signing identities: create or upload an Apple Distribution certificate, then fetch the App Store profiles of both App IDs (Codemagic uses them together: the extension's ID starts with the app's). If your team already builds other apps there, use the certificate it has – never revoke it or create a new one, the other apps sign with it – and only add App Store profiles for these two IDs (Apple Developer › Profiles, with that certificate), then fetch them. Changing an App ID's capabilities makes its profiles invalid: generate them again and fetch the new ones.
  6. Create the app in App Store Connect (first point of this step), then start the workflow iPhone app to TestFlight. The build number counts up by itself (from the latest TestFlight build; the app's Apple ID can also be set in APP_STORE_APPLE_ID).

The bundle ID in codemagic.yaml follows branding/brand.yaml – the rebrand script changes it. The second workflow runs the device tests (integration_test/) on an iPhone simulator and needs no Apple account.

For developers

Customize (files)

Name, ids, colours and icons are in Part B. Everything else you may want to change is listed here. After a change, stop the app and run it again.

All file paths below are relative to the included Cutora/ source folder. Open that folder in your editor; no developer-specific location is required.

WhatWhere
App name, ids, accent colour, support e-mail, links, icon, launch screenbranding/brand.yaml, then dart run tool/rebrand.dart
Dark and light background colours, timeline colours, error and success colourslib/ui/core/themes/colors.dart
The app's own fonts (headings, text, Arabic, Hindi)lib/ui/core/themes/typography.dart, pubspec.yaml, assets/fonts/
Fonts for texts on the videolib/ui/editor/text/text_fonts.dart – see below
Text colours and the 20 ready-made text styleslib/ui/editor/text/text_palette.dart
Text templates (font, colours and animations together)lib/ui/editor/text/text_templates.dart
Video effects offered, and their orderlib/domain/color/video_effects.dart
Voice effectslib/domain/audio/voice_effects.dart
Speed curveslib/domain/editing/speed_ramps.dart
Collage layoutslib/domain/editing/collage.dart
GIF width, frame rate and lengthwidth, frameRate and longest in lib/data/services/export/gif_maker.dart
How quiet and how long a pause must be for Cut pausesquiet, minPause and air in lib/domain/audio/silences.dart
How different two frames must be for Split scenes, shortest scenesceneChange and minScene in lib/domain/editing/scenes.dart
Longest footage Reverse takes (30 s)maxReverse in lib/ui/editor/view_models/editor_view_model.dart
Drawn sticker shapeslib/ui/editor/stickers/shape_stickers.dart (a name and a painter each)
Emoji stickerslib/ui/editor/stickers/emoji_library.dart – see below
Filterslib/domain/color/filter_presets.dart – see below
Export sizes, frame rates, default export, longest video, files per picklib/config/app_config.dart – see below
Speed range, default photo and text length, transition length, undo stepslib/domain/editing/editing_limits.dart
Sound effects: add, remove or rename onePut an AAC .m4a file into assets/sounds/, add a line to SoundEffects.all in lib/domain/audio/sound_effects.dart (id = file name, group, length) and its name to soundEffectName in lib/ui/core/l10n.dart plus the ARB files
Speech model for captions: its address, size and checksum (host the file yourself, or take "tiny" or "small")captionModel in lib/config/app_config.dart
Caption looks, place and shortest time on screenCaptionStyle, captionPlacement, minCaptionLength in lib/domain/captions/captions.dart
How the word being said stands out: its colours, and how each style comes inhighlightColors, highlightAnimation in lib/domain/captions/spoken_words.dart
Caption languages in the listcaptionLanguages in lib/ui/editor/widgets/panels/captions_panel.dart
How strongly Reduce noise worksleastGain and the pause gain in lib/domain/audio/noise_reduction.dart
Green and blue of the chroma keygreenScreenColor, blueScreenColor in lib/domain/models/chroma_key.dart
Keyframe curves (linear, smooth) and how close the playhead counts as "on" a keyframeeasingOf in lib/domain/animation/keyframes.dart; keyframeReach in editing_limits.dart
Background colours of the Format tool_colors in lib/ui/editor/widgets/panels/canvas_transition_panels.dart
Strongest blur of the Format background (Strength 100 %)The 0.1 in backdropSigma in lib/domain/editing/canvas_geometry.dart – a tenth of the video's short side. Preview and export both use it.
All texts of the applib/l10n/app_<language>.arb – see Languages
iOS permission textsios/Runner/Info.plist – see Permissions & stores
Version and build numberversion: in pubspec.yaml

Colours

The accent colour comes from branding/brand.yaml. All other colours are in lib/ui/core/themes/colors.dart: the dark set (ink, surface, surfaceHigh …) for the editor and dark mode, the light set (paper, paperHigh …) for home and settings in light mode, and one colour per kind of timeline item (trackText, trackSticker, trackMusic …). On light backgrounds the app darkens the accent automatically until text in it is readable.

Home screen in light mode

Fonts for texts

  1. Put the font files and their license file into assets/fonts/, for example Poppins-Medium.ttf, Poppins-Bold.ttf and OFL-Poppins.txt. Every .txt file there appears in the app under Settings › Open-source licenses on its own.
  2. Add the family to the fonts list in pubspec.yaml (under flutter):
        - family: Poppins
          fonts:
            - asset: assets/fonts/Poppins-Medium.ttf
              weight: 500
            - asset: assets/fonts/Poppins-Bold.ttf
              weight: 700
  3. Add one line to the list TextFonts.all in lib/ui/editor/text/text_fonts.dart – the id, the family from pubspec.yaml and the name in the font picker:
        TextFont('poppins', 'Poppins', 'Poppins'),
    Normal text uses weight 500 and bold text 700 unless you pass regular: or bold:. Projects store the id, so never change the id of a font you have released.
  4. Stop the app and start it again – new fonts don't arrive with hot reload.

Only add fonts whose license allows you to ship them inside an app, such as the SIL Open Font License or Apache 2.0.

Emoji stickers

EmojiLibrary.groups in lib/ui/editor/stickers/emoji_library.dart lists the emoji of each group in picker order, written as code points in hex: 1f60d for 😍, 2764-fe0f for ❤️. Reorder, remove or add entries freely. The phone's own emoji font draws them, so no image files are involved. A new group needs three things: a value in the EmojiGroup enum, its tab name in lib/ui/editor/widgets/panels/sticker_panels.dart and a stickerGroup… text in every ARB file.

Filters

  1. Add a preset to filterPresets in lib/domain/color/filter_presets.dart, built with the helpers in that file (_rgb, _sat, _con, _off):
      FilterPreset('sunset', () => _rgb(1.1, 0.98, 0.88).after(_sat(1.2))),
    Projects store the id – of a clip's filter and of a filter item. Never change it once the filter is released.
  2. Add its name to every ARB file in lib/l10n/, for example "filterSunset": "Sunset". Then run flutter gen-l10n.
  3. Connect id and name in filterName in lib/ui/core/l10n.dart:
        'sunset' => filterSunset,
    Without this line the picker shows the id itself.
  4. To make a filter sharpen too, give it sharpen (how strongly, 1 doubles the detail) and, if you like, sharpenRadius (how far, in pixels of a 1080-pixel picture), like the crisp looks:
      FilterPreset('crisp', () => _con(1.06), sharpen: 0.6, sharpenRadius: 1.2),
    The strength slider tones the sharpening down with the colour. The names "4K Look" and "8K Look" describe a look; the size of the exported video is chosen on the export screen.

Preview and export use the same colour matrix and the same sharpening, so the export looks like the preview.

Export and limits

lib/config/app_config.dart holds the export choices and import limits:

  static const List<ExportResolution> exportResolutions = [
    ExportResolution.p480,
    ExportResolution.p720,
    ExportResolution.p1080,
    ExportResolution.p1440,
    ExportResolution.p2160,
  ];
  static const List<int> exportFrameRates = [24, 25, 30, 50, 60];
  static const ExportSettings defaultExport = ExportSettings();
  static const Duration maxImportLength = Duration(minutes: 30);
  static const int maxPickCount = 30;
  • Remove ExportResolution.p2160 to hide 4K, for example if many of your users have older phones.
  • The default export is 1080p, 30 fps, quality “Recommended”. Another default: ExportSettings(resolution: ExportResolution.p720, frameRate: 30).
  • maxImportLength is the longest video accepted on import; very long files make older phones slow. maxPickCount is the number of files per pick.
Earn with the app

Ads (AdMob)

The app comes with Google AdMob built in: an ad while a video exports (under the progress, which always stays in view), and a full-screen ad when the user leaves the finished video. It starts with Google's test ids – you see “Test Ad” and nothing is paid out. Put in your own ids before you publish, or switch ads off.

WhatWhere and when
Medium rectangle (300 × 250)On the export screen while the video renders – people wait there anyway. On a calm card, well apart from the progress and the Cancel button.
Full-screen (interstitial)When the user leaves a finished export (Done or back), at most one every three minutes – never over the result.
The first daysNo ads at all for the first 7 days after the first start, so new users get to know the app first – and no consent form yet. Change the number with ad_free_days in branding/brand.yaml (0 = ads from the start). Debug builds show ads at once, so you can try them.
Consent formGoogle's own form before the first ad, only where the law asks for it (EU, UK, Switzerland). Ads load only after the answer.
Ad privacy optionsIn Settings for those users, to change their answer at any time (Google requires it).

Your own ids

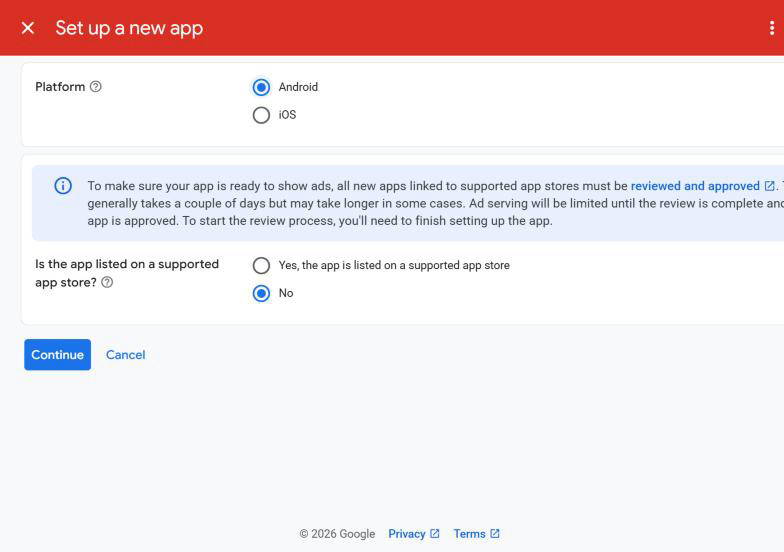
  1. Sign in at admob.google.com and add your app: Apps Add app, once for Android and once for iOS. Not in the store yet? Answer No to “Is the app listed on a supported app store?” – you link the store listing later. Each app gets an app id with “~”.
    AdMob: Set up a new app – platform Android, not listed on an app store yet
    Platform, and “No” while the app is not in the store yet.
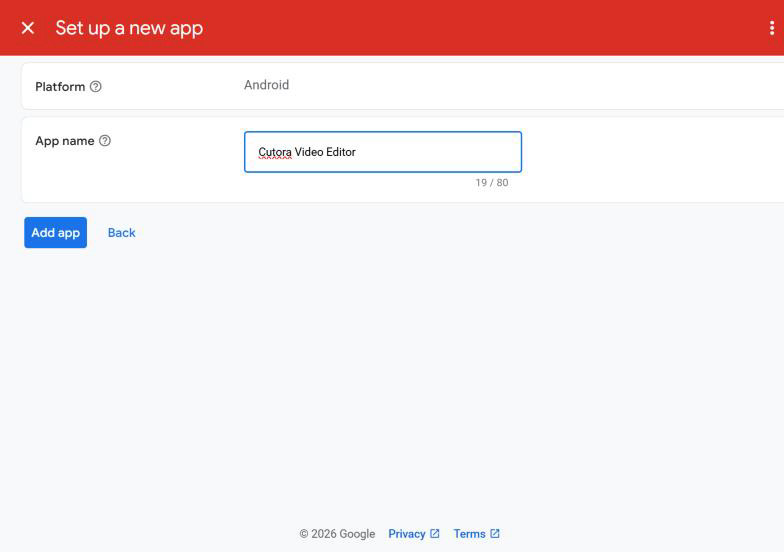
    AdMob: the app name field
    The name of your app, as users will see it.
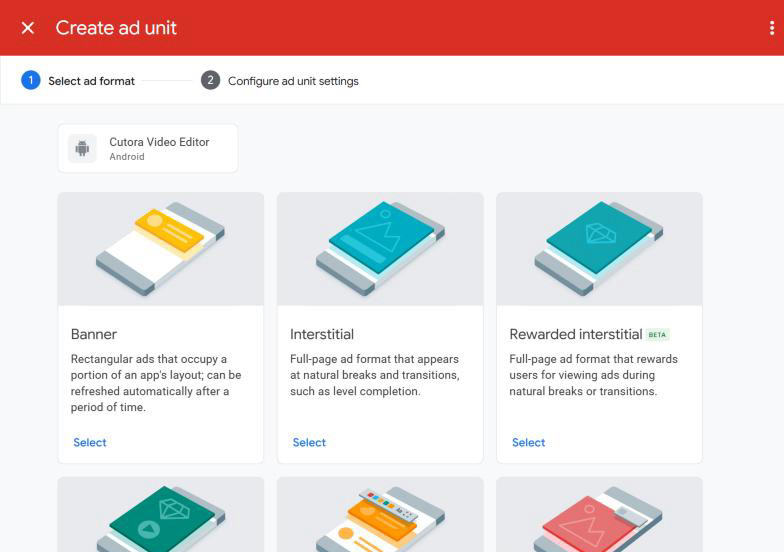
  2. For each app create two ad units: Ad units Add ad unit – one Banner and one Interstitial. Each unit gets an id with “/”. (One banner unit serves the 300 × 250 size too.)
    AdMob: choosing the ad format – Banner, Interstitial, Rewarded interstitial
    Banner first, then the same again with Interstitial.
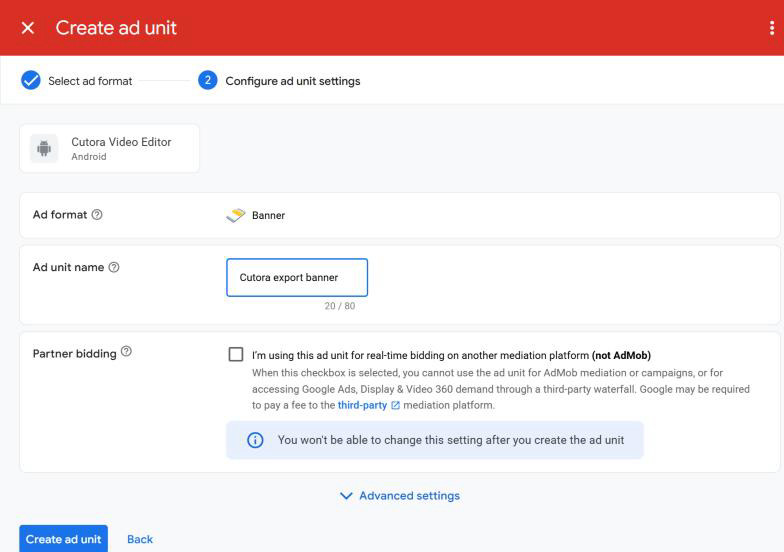
    AdMob: naming the banner ad unit
    A name only you see, for example “export banner”.
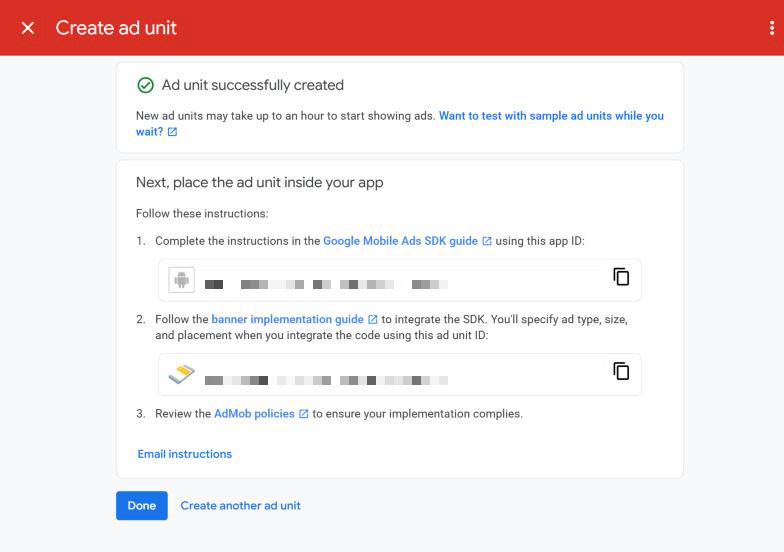
    AdMob: the ad unit was created; the app id and the ad unit id are shown (blurred here)
    Done: copy the app id (with “~”) and the ad unit id (with “/”). Your own ids are shown here, blurred in this picture.
  3. Paste the ids into the ads: section of branding/brand.yaml:
    ads:
      enabled: true
      ad_free_days: 7
      ios_tracking_prompt: false
      android_app_id: ca-app-pub-1234567890123456~1111111111
      ios_app_id: ca-app-pub-1234567890123456~2222222222
      android_banner: ca-app-pub-1234567890123456/3333333333
      ios_banner: ca-app-pub-1234567890123456/4444444444
      android_interstitial: ca-app-pub-1234567890123456/5555555555
      ios_interstitial: ca-app-pub-1234567890123456/6666666666
  4. Run the rebrand script (step 7). It writes the app ids into AndroidManifest.xml and Info.plist and the unit ids into lib/config/brand.dart, and checks that every id looks right:
    dart run tool/rebrand.dart
  5. In AdMob open Privacy & messaging and create a European regulations (GDPR) message for your apps, then publish it. That is the consent form the app shows. For iOS you can also add an IDFA explainer: it asks for Apple's tracking permission, so ads can fit the user better. Then set ios_tracking_prompt: true in branding/brand.yaml and run the rebrand script (it adds the question's text, NSUserTrackingUsageDescription, to Info.plist), and in App Store Connect › App Privacy mark Device ID as used for tracking. With ad-free days the question comes with the first ad, after those days: tell App Review in the review notes. Without an IDFA explainer leave ios_tracking_prompt: false: while Info.plist has that text, App Store Connect does not publish privacy details without tracking.
  6. Put the app-ads.txt line that AdMob shows you on your website (the one in your store listing). Without it, fewer ads are filled. dart run tool/legal_pages.dart writes the file for you (see Legal pages).

A release build shows real ads after a few hours; in the first days fill can be low while AdMob learns your app.

Never tap your own ads

Clicking your own live ads can get your AdMob account closed. While testing, keep the test ids, or add your phone as a test device in AdMob (Settings Test devices).

No ads

Set enabled: false in the ads: section and run the rebrand script. The app then shows no ad and no consent form. The ad library stays in the app (it needs an app id to start, so the test id stays in the projects); to remove it completely, delete google_mobile_ads from pubspec.yaml together with lib/data/services/ads/ads_service_admob.dart, lib/ui/core/widgets/banner_ad_slot.dart and their uses. The rules in android/app/proguard-rules.pro can stay.

Change where and how often

WhatWhere
The ad on the export screenBannerAdSlot.rectangle() in lib/ui/export/widgets/export_screen.dart. BannerAdSlot() is a screen-wide banner for other places.
The full-screen ad after an exportshowInterstitial() in lib/ui/export/view_models/export_view_model.dart
Days without ads after the first startad_free_days in branding/brand.yaml; the check is adsServiceProvider in lib/data/providers.dart, the first start is saved by lib/data/repositories/settings/first_start_store.dart
Time between two full-screen ads (3 minutes)interstitialDue in lib/data/services/ads/ads_service.dart
Consent and starting the ad SDKlib/data/services/ads/ads_service_admob.dart. Debug builds show the consent form as in the EU, so you can try it anywhere.
Nine languages

Languages

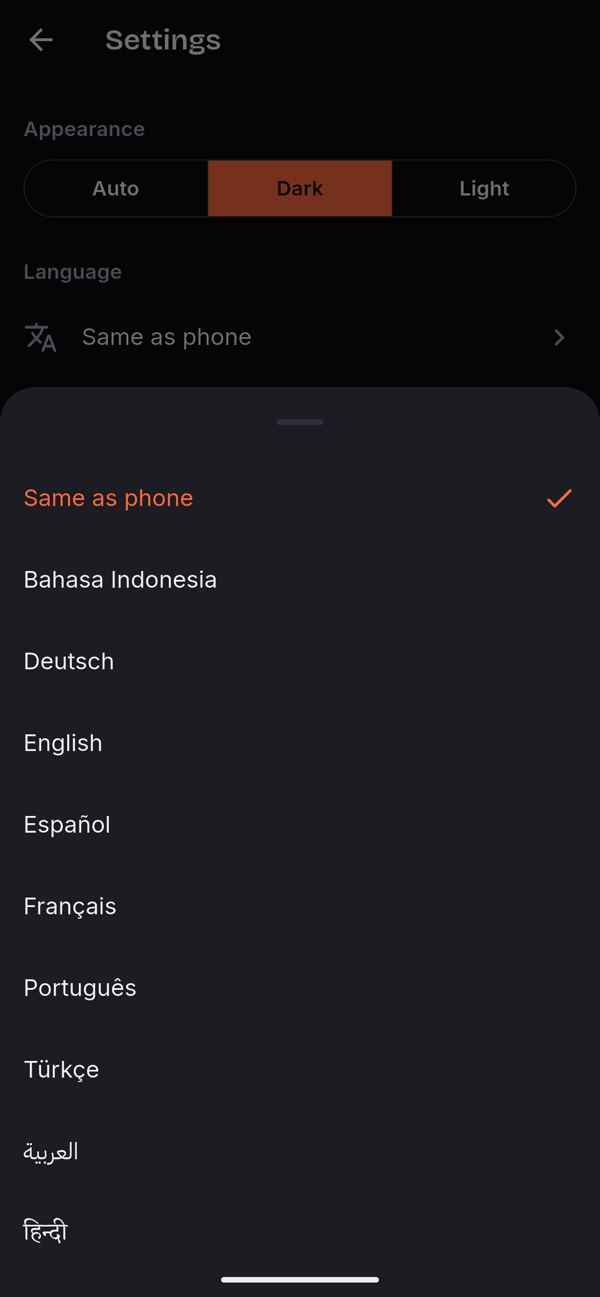
Users pick a language under Settings › Language: the row shows the current one, a tap opens the list of all languages. Same as phone uses the first phone language the app has, otherwise English.

CodeLanguageNotes
enEnglishThe template: app_en.arb also holds the descriptions of every text.
deDeutsch
arالعربيةRight to left. Uses IBM Plex Sans Arabic for the whole app.
esEspañolNeutral Spanish.
ptPortuguêsBrazilian Portuguese.
frFrançais
trTürkçe
idBahasa Indonesia
hiहिन्दीDevanagari letters come from the bundled Eczar font, so Hindi looks the same on every phone.
Settings: the language row with its list of all nine languages open
Settings › Language
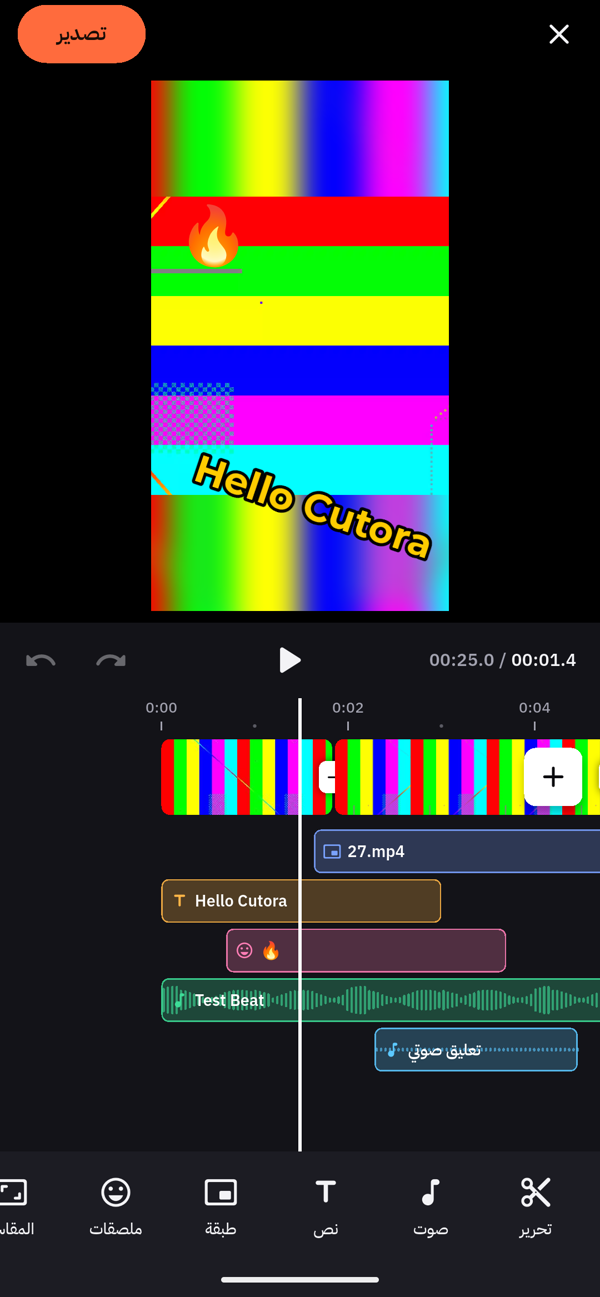
The editor in Arabic, right to left
Arabic, right to left

Change a text

Open lib/l10n/app_<code>.arb and change the text after the key. Keep words in braces such as {count} and the plural structure as they are. Then run:

flutter gen-l10n

The generated code in lib/l10n/gen/ is included and updated by this command (flutter pub get runs it too).

Add a language

  1. Copy lib/l10n/app_en.arb to app_xx.arb (xx = the language code, e.g. it) and set "@@locale": "it" at the top.
  2. Translate the texts. Keep {placeholders} and the plural structure. The description entries (keys like "@homeNewProject") can go; keep "@@locale".
  3. Add the language in its own name to languageNames in lib/ui/settings/view_models/settings_view_model.dart, sorted by that name:
      'it': 'Italiano',
  4. Add the code to CFBundleLocalizations in ios/Runner/Info.plist, so the App Store lists the language and iOS offers it in the app's settings:
    		<string>it</string>
  5. Generate and test:
    flutter gen-l10n
    flutter test
    A test checks every ARB file: the same keys as the English one, the same placeholders, valid plurals, and that the Settings list matches the files.

Flutter's own widgets (for example the copy and paste menu) must know the language too; Flutter covers about a hundred. Languages with other scripts, such as Thai, use the phone's system font. For the same look on every phone, bundle a font for them and add it to fontFamilyFallback in lib/ui/core/themes/typography.dart.

Remove a language

Delete its ARB file, its line in languageNames, its entry in CFBundleLocalizations and the file lib/l10n/gen/app_localizations_xx.dart (gen-l10n leaves it behind). Then run flutter gen-l10n and flutter test.

Privacy

Permissions & stores

The app asks only for what a feature needs, at the moment the user first uses it.

FeatureAndroidiPhone
Picking videos and photosSystem photo picker. No permission, nothing to declare in the Play Console.System photo picker. No permission dialog.
Picking musicSystem file picker. No permission.Files picker (MP3, M4A, AAC, WAV, FLAC). No permission.
Recording a video (Camera)The phone's camera app does the recording. No permission for the app.NSCameraUsageDescription, asked the first time the camera opens.
Reading a text aloudThe phone's speech engine; the manifest lists the TTS_SERVICE intent so Android 11+ lets the app see it. No permission.The system voices. No permission.
Recording a voice-overRECORD_AUDIO, asked the first time the user records.NSMicrophoneUsageDescription, asked the first time.
Saving the exported videoAndroid 11 and newer: no permission. Android 7–10: storage access, asked once (WRITE_EXTERNAL_STORAGE, limited to those versions).Photo library access, asked at the first save. The video goes into an album named after the app, so the app asks for library access, not just “add photos”.
Internet and advertising idINTERNET (stated in the app's manifest) for ads and for downloading the speech model of Auto captions once; the AdMob library adds ACCESS_NETWORK_STATE and AD_ID. No dialog. Everything else works offline, captions included once the model is there.No permission needed for the internet. Apple's tracking question only with ios_tracking_prompt: true in brand.yaml and an IDFA explainer in AdMob (see Ads); otherwise the app never asks.

On Android, libraries also add a few install-time permissions that never show a dialog, for example ACCESS_NETWORK_STATE and WAKE_LOCK from the Android video engine.

iOS permission texts

iOS shows these texts in the permission dialogs. They are in ios/Runner/Info.plist:

<key>NSCameraUsageDescription</key>
<string>Record videos to edit.</string>
<key>NSMicrophoneUsageDescription</key>
<string>Record voice-overs for your videos.</string>
<key>NSPhotoLibraryAddUsageDescription</key>
<string>Your finished videos are saved to your photo library.</string>
<key>NSPhotoLibraryUsageDescription</key>
<string>Pick videos and photos to edit, and save your finished videos to an album.</string>

Reword them for your app if you like, but keep them specific – Apple rejects empty or vague texts. They are in English for every language; to translate them, add an InfoPlist.strings file per language in Xcode.

Store forms

  • Downloads from Google. Translating captions downloads ML Kit's language model from Google once per language; no captions or other user data are sent. Mention it in your privacy policy if you keep the feature.
  • Data collection. Videos, photos and recordings stay on the phone; there is no account, no analytics and no server. Only the ads (Google AdMob) collect data: the advertising id and data about the ads shown. Declare them in Google Play's Data safety form and in App Store Connect's App Privacy as Google describes in its AdMob help (“Data disclosure”), and set Contains ads in the Play Console. With ads off (see Ads), the app collects no data. Your answers are your responsibility.
  • Privacy policy. Both stores need a privacy policy URL. Use the same page as privacy_url in the brand file; the app shows it in Settings. Ready-made pages: see below.
  • Encryption (App Store). App Store Connect asks about encryption for each build. The app has no encryption of its own; check Apple's current guidance before you answer.
  • Photo and video permissions (Google Play). Not needed – the app uses the system photo picker instead of reading the gallery.

The project writes your privacy policy and terms of use as web pages in English and German. They describe exactly what this app does with data: no account and no server, videos stay on the phone, the speech model is downloaded once – and the ads with their consent form and ad-free days, only if ads are on. A legal notice (the German “Impressum”) is optional.

  1. Fill in branding/legal.yaml: who offers the app, the postal address, the law of your terms and whether you need a legal notice. App name, support e-mail and ads come from branding/brand.yaml.
  2. Write the pages:
    dart run tool/legal_pages.dart
    They land in build/legal/: privacy/, terms/, legal-notice/ (if you asked for it) and, with your own AdMob ids, app-ads.txt.
  3. Put the folder on any web host: your own website, GitHub Pages, or Firebase Hosting for free (firebase init hosting with build/legal as the public folder, then firebase deploy --only hosting). app-ads.txt belongs at the top level of the website in your store listing.
  4. Put the two addresses into privacy_url and terms_url in branding/brand.yaml and run the rebrand script (step 7).

The pages take your accent colour, follow light and dark mode and open in German for German browsers (#de at the end of an address picks German). The texts are a careful starting point, not legal advice – have them checked for your country. If you change what the app does with data, change tool/legal/legal_texts.dart as well.

For developers

Project structure & tests

MVVM in the layers the Flutter team recommends: widgets show the state of a view model, view models call repositories, repositories talk to the phone. Riverpod 3 connects them, go_router handles navigation, freezed and json_serializable build the data models.

FolderWhat's inside
lib/main.dart, lib/app.dartStart-up (settings, project storage, audio session) and the app widget with themes, language and router.
lib/config/brand.dart (generated by the rebrand script) and app_config.dart.
lib/domain/The editor core in plain Dart: models (project, timeline, clips, layers), timeline edits with undo and redo, filters and colour maths, animations, the export plan, motion measuring and smoothing for Stabilize (motion/), use cases.
lib/data/Repositories (projects, media, gallery, settings, thumbnails, waveforms), services (export engine, voice recorder) and providers.dart.
lib/ui/One folder per feature – home, editor (preview, timeline, panels), export, settings – each with view_models/ and widgets/, plus core/ for themes and shared widgets.
lib/routing/Routes and the go_router setup.
lib/l10n/ARB files and the generated AppLocalizations in gen/.
lib/utils/Small helpers: results, time codes, font licenses.
test/Unit and widget tests, in the same folders as lib/. test/tool/ tests the rebrand script on temporary copies; test/l10n/ checks the ARB files.
testing/Shared test helpers: fakes/ (a FakeBackend with in-memory repositories, a fake video player and recorder) and builders.dart for test data.
tool/rebrand.dart with its parts in rebrand/, legal_pages.dart with its parts in legal/, and branding/, which draws the default icon.
branding/, assets/fonts/Brand file, legal file and icon images; bundled fonts with their licenses.
android/, ios/The platform projects. The rebrand script changes the few lines that carry your brand.
packages/pro_video_editor/The video engine: a copy of pro_video_editor 2.23.0 with three additions: clips that move with keyframes, masks, and the times of a video's frames. CUTORA-CHANGES.md there lists the changes.
packages/whisper_native/Speech recognition for captions: whisper.cpp 1.9.4 (MIT) with a small C interface, built by CMake on Android and by CocoaPods on iOS, called through dart:ffi.
integration_test/Tests on a real phone, emulator or simulator: exports small projects and checks the finished videos, recognises speech, and steadies a video shaken by known amounts.
codemagic.yamliPhone builds without a Mac on Codemagic: upload to TestFlight, device tests on a simulator (step 12).

Every change in the editor is a small command on an immutable project, which makes undo and redo reliable and the core easy to test. The video engine (pro_video_editor) sits behind lib/data/services/export/, so an update or a different engine touches one place. It is kept in packages/ as a tested copy on purpose, because Cutora adds to it (keyframed clips, masks, frame times). To move to a newer version, apply the changes described in its CUTORA-CHANGES.md, then run the device test below and check preview and export on real Android and iOS phones.

Commands

CommandWhen
flutter analyzeChecks the code. The project is delivered with No issues found!
flutter testRuns all unit and widget tests – no phone needed, fakes stand in for the phone's engine.
flutter test integration_test -d <device>Exports small projects with the real video engine on a connected phone, emulator or simulator (flutter devices lists them) and checks the finished videos (movement, crop, masks, chroma key), lets whisper listen to a speech sample (downloads the 32 MB "tiny" model and the sample, so it needs the internet) and steadies a video shaken by known amounts. Takes a few minutes. It may replace the app installed on that device, with its projects – use an emulator or a test phone.
dart run build_runner buildAfter changing a model in lib/domain/models/. The generated *.freezed.dart and *.g.dart files are included.
flutter gen-l10nAfter changing an ARB file.
dart run tool/rebrand.dartAfter changing branding/brand.yaml or the PNGs.
dart run tool/legal_pages.dartAfter changing branding/legal.yaml, the app name, the support e-mail or the ads: writes the legal pages again.
flutter test tool/branding/render_icons_test.dartRedraws the default icon in the colours of the brand file.
Something wrong?

Troubleshooting

“flutter” is not recognized / command not found

Flutter's bin folder isn't in your PATH yet, or the terminal was opened before you added it. Repeat step 1, item 3, then open a new terminal – and restart Android Studio.

Windows: flutter test or a build stops with “ShaderCompilerException”, “Could not write file” or “IconTreeShakerException”

The project sits in a folder path that is too long for Windows (260 characters, counted down to the build files). Move the project to a short path, for example a folder called dev right on your drive, then run flutter clean and flutter pub get there.

The first Android build stops while installing the NDK or “android-36”

Install SDK Platform 36 and NDK 28.2.13676358 with Android Studio's SDK Manager (the yellow box in step 2), then build again. On Windows, the old sdkmanager tool that Gradle uses for this can crash.

“SDK processing. This version only understands SDK XML versions up to 3 but an SDK XML file of version 4 was encountered”

Harmless: Android Studio and the command-line tools are of different ages. Updating Android SDK Command-line Tools in the SDK Manager makes the message go away.

flutter emulators shows no emulator

Start the emulator from Android Studio › Device Manager instead. Once it runs, flutter devices lists it and flutter run uses it.

The export is slow or stops on the emulator

Emulators encode video in software and can run only a few video codecs at a time. The app frees the preview's codecs during the export and retries once when no codec is free, but an emulator can still fail. Test exports on a real phone.

“The export didn't work. Try a lower resolution.”

The phone's encoder couldn't handle the settings – usually 4K or 60 fps on an older phone. Export again at 1080p or 30 fps. If many of your users have older phones, remove 4K from exportResolutions (Customize).

“The video is ready, but it couldn't be added to your gallery.”

The app has no access to the photo library. On an iPhone: Settings › [your app] › Photos › Full Access – “Add Photos Only” isn't enough, because the video goes into an album named after the app. On Android 10 and older: allow storage access under Settings › Apps › [your app] › Permissions. Until then the user can still tap Share.

Voice-over only says “Add a video or photo to start.”

A recording plays along with the video, so the project needs at least one clip on the timeline first. Add a video or photo, then open Audio › Voice-over again.

“Allow microphone access in your phone's settings to record.”

The user declined the microphone. iPhone: Settings › [your app] › Microphone. Android: Settings › Apps › [your app] › Permissions › Microphone.

“1 file couldn't be added.” or “This file can't be edited on this phone.”

The file is damaged, uses a format the phone can't decode (for example some 10-bit HDR videos on older phones), or is longer than 30 minutes (maxImportLength in app_config.dart).

The old icon, name or launch screen still shows

Phones cache icons. Run flutter clean, uninstall the app and install it again. On an iPhone, an old launch screen goes away after deleting the app and restarting the phone.

The rebrand script says “Nothing was changed.”

A value in branding/brand.yaml needs a fix – the lines above that message say which. The usual ones: a colour without quotes (write "#2EC4B6"), an Android id with capitals or hyphens, an underscore in the iOS bundle id, or an image that isn't a square PNG.

Xcode: “Signing for "Runner" requires a development team”

Choose your team under Runner › Signing & Capabilities (step 11). If no team is listed, add your Apple ID under Xcode › Settings › Accounts.

Xcode: “could not find included file 'Generated.xcconfig'” or missing packages

Run flutter pub get in the project folder and open ios/Runner.xcworkspace again – not the .xcodeproj. Still missing? Run flutter build ios --config-only --no-codesign, which prepares the whole iOS project without signing it.

The release build closes right after it starts

Release builds are shrunk by R8, which removes code that looks unused – also code a library only creates by name. android/app/proguard-rules.pro keeps what the ad library needs (its WorkManager database), so keep that file. If you add a library and the release build closes while flutter run works, start flutter run --release with the phone connected, find the line “Caused by” in the output and add a -keep rule for that class to the file.

Google Play: the bundle “was signed in debug mode”

android/key.properties wasn't found when you built, so the bundle got the debug key. Check the file's place and the storeFile path (step 9), then build again.

Gradle: “Unresolved reference: util”

Put import java.util.Properties and import java.io.FileInputStream at the very top of build.gradle.kts, as in step 9, instead of writing java.util.Properties in the code.

build_runner: “These options have been removed and were ignored”

build_runner 2.16 dropped --delete-conflicting-outputs. Run dart run build_runner build without it.

Good to know

FAQ

Do I need a server, Firebase or user accounts?

No. Everything runs on the phone. There is nothing to host and no monthly cost per user.

Can I earn money with the app?

Yes, with the built-in Google AdMob ads: put your ids into branding/brand.yaml (see Ads). If you prefer no ads, set enabled: false there.

Is FFmpeg included?

No. Preview and export use the phone's own video engine – Media3 on Android, AVFoundation on iOS – through the pro_video_editor package (BSD-3-Clause). That keeps the app small and spares you FFmpeg's licensing questions.

Where are projects saved?

On the phone, in the app's own documents folder: one folder per project with project.json, copies of its clips and a cover picture. The originals in the gallery stay untouched. Uninstalling the app deletes the projects; there's no cloud sync.

Can users share videos and photos from the gallery into the app?

Yes. In the gallery, Photos, Files or any other app they choose videos and photos, tap Share and pick the app; it opens with a new project of them. On Android the app is in the share menu through its manifest (SEND and SEND_MULTIPLE); on the iPhone through the share extension ios/ShareExtension, which hands the files over in the app group group.<bundle id>. The code is in packages/media_inbox and lib/ui/home/widgets/share_receiver.dart.

Can users add songs from music streaming apps?

No. Users pick audio files that are on the phone (on an iPhone through the Files app). Songs from streaming services are copy-protected. Remind your users to use only music they have the rights to.

Are there ads, in-app purchases or a watermark?

Ads yes: Google AdMob shows a rectangle while a video exports and a full-screen ad when it is done – from the 8th day after the first start (you choose the number of ad-free days), or never, if you switch them off (Ads). There are no in-app purchases: all features are open to your users, and exported videos have no watermark.

Do Auto captions need a server or an API key?

No. whisper.cpp listens on the phone itself. Only the speech model (57 MB) is downloaded once, the first time a user makes captions, from Hugging Face; after that it works without internet. To depend on no one else, put the model file on your own server and change captionModel in lib/config/app_config.dart – the app checks the file's size and SHA-256. The "tiny" model (32 MB) is faster and rougher, "small" (190 MB) slower and better.

How does the highlight of the spoken word work?

whisper.cpp gives a time for every word. Each caption keeps them (wordTimes), and the word whose time has come is drawn over the caption – in its colour, on a box, or popping in. When a caption's words are edited and no longer match, the times are spread over the caption by word length. In the export each word's highlight is a small picture of its own, placed exactly on the word; on Android, layers that never show at the same time share one overlay, so even hundreds of them export quickly.

How fast are captions?

On a recent phone a minute of speech takes roughly 10–30 seconds with the "base" model; older phones take longer. The panel shows the progress, and the user can stop it.

How does Stabilize work, and how long does it take?

The first time a strength is chosen, the app measures how the camera moved: it looks at about 30 small frames a second, follows corners from frame to frame and ignores things that move on their own. That takes roughly as long as the clip on a recent phone (less on a fast one). Then a smoothed camera path is worked out, and a window of the picture, zoomed in just enough, moves against the shake. The preview plays a steadied copy made right after (in the app's cache folder; made again if the phone clears it), and the export steadies the full-quality video the same way. Other strengths need no new measuring. Very strong shake can only be calmed as far as the zoom allows: up to 6 %, 12 % or 20 % for light, medium and strong (lib/domain/motion/stabilizer.dart).

Can videos and photos get keyframes too?

Yes. Videos and photos on the main track, picture-in-picture clips, texts and stickers all take keyframes for place and size. Rotation goes into the keyframe too (the item turns between keyframes); mirroring belongs to the whole item. For moving clips the export uses the engine copy in packages/pro_video_editor/, which places a clip anew in every frame.

Can I build it for the web or desktop?

No. The editor needs the phone's native video engine, so the project contains Android and iOS only.

Does it run on tablets?

It installs on Android tablets. On iOS it is an iPhone app, which iPads run in iPhone mode. To publish a real iPad app, add iPad in Xcode (step 12), try the app on an iPad and add iPad screenshots.

Why does the editor stay dark in light mode?

So video colours look right while editing. Home and settings follow the appearance setting. The editor and export screens set their dark theme in editor_screen.dart and export_screen.dart.

Do I have to rename the Dart package “cutora”?

No – users never see it. If you want to anyway, change name: in pubspec.yaml, replace package:cutora/ in all Dart files (lib/, test/, testing/, tool/) and run flutter pub get.

How do I update to a new version of Cutora?

Keep your project in Git, then compare the new version with yours. Copy over branding/brand.yaml with your PNGs and your own changes, run flutter pub get and the rebrand script. Your keystore and android/key.properties stay where they are; add the signing lines from step 9 again if build.gradle.kts was replaced.

Thanks

Credits & licenses

The bundled open-source components use the licenses listed below. Preserve their license notices when distributing your app. Google services are additionally governed by their service terms. No FFmpeg is used.

Packages in the app

PackageUsed forLicense
Flutter SDK, flutter_localizationsFramework, built-in translationsBSD-3-Clause
pro_video_editor 2.23.0 (copy with three additions, in packages/)Export, thumbnails, waveforms, extracting sound – on the phone's own engine. The mask shapes heart and star use Inigo Quilez's distance functions (MIT).BSD-3-Clause
whisper.cpp 1.9.4 with ggml (in packages/whisper_native/)Speech recognition for captions, on the phoneMIT
Whisper "base" speech model (downloaded at the first use, not in the app)The model whisper.cpp listens with (OpenAI's Whisper weights in ggml's format)MIT
cryptoChecking the downloaded speech model (SHA-256)BSD-3-Clause
video_playerPreview playbackBSD-3-Clause
google_mlkit_translationCaptions in another language (on-device translation; the models come from Google, under the ML Kit terms)MIT (the plugin); ML Kit: Google APIs Terms of Service
flutter_ttsRead aloud (the phone's own voices)MIT
just_audio, audio_sessionMusic and voice-over playback, audio focusMIT (just_audio includes ExoPlayer code under Apache-2.0)
google_mobile_adsAds (Google AdMob) and the consent formApache-2.0; ads are served under Google's AdMob terms
recordVoice-over recordingBSD-3-Clause
image_pickerPicking videos and photosBSD-3-Clause (one part Apache-2.0)
file_pickerPicking music filesMIT
galSaving into the galleryBSD-3-Clause
share_plusShare sheetBSD-3-Clause
flutter_riverpodState managementMIT
go_routerNavigationBSD-3-Clause
freezed_annotation, json_annotationData modelsMIT, BSD-3-Clause
intl, uuidNumber and date formats, idsBSD-3-Clause, MIT
path, path_provider, shared_preferencesFiles and settingsBSD-3-Clause
package_info_plus, url_launcherVersion number, links, support e-mailBSD-3-Clause
AndroidX Media3, Kotlin coroutines (added by Gradle)The Android video engineApache-2.0

Their platform parts (for example video_player_android) use the same licenses. When you build, Flutter collects every package license; users find them in the app under Settings › Open-source licenses. THIRD-PARTY-LICENSES.txt in the project folder lists the fonts and packages with their licenses as well.

Development tools (not part of the app)

ToolLicense
build_runner, json_serializable, flutter_lints, yaml_edit, plugin_platform_interface, video_player_platform_interface (tests)BSD-3-Clause
freezed, flutter_launcher_icons, flutter_native_splash, yaml, imageMIT

Fonts

FontUsed forLicense
Bricolage Grotesque, InterThe app's headings and text; texts on the videoSIL Open Font License 1.1
IBM Plex Sans ArabicArabic; texts on the videoSIL Open Font License 1.1
EczarHindi; texts on the videoSIL Open Font License 1.1
Montserrat, Oswald, Rubik, Raleway, Lato, Work Sans, Abril Fatface, VazirmatnTexts on the videoSIL Open Font License 1.1
Roboto MonoTexts on the videoApache-2.0

The license texts are in assets/fonts/ (OFL-*.txt, LICENSE-RobotoMono.txt); the app shows them under Settings › Open-source licenses as well.

Source links and service requirements

  • Flutter and pub.dev: package sources and licenses. Exact resolved versions are recorded in pubspec.lock.
  • pro_video_editor: the BSD-3-Clause video engine, included with Cutora-specific changes and its original license.
  • whisper.cpp and OpenAI Whisper: MIT-licensed local speech recognition. The model download repository hosts the initial speech-model download; the URL, size and SHA-256 are configured in lib/config/app_config.dart. No cloud transcription API is used.
  • Google ML Kit translation: local caption translation after the required language models have been downloaded. No translation API key is entered by the buyer.
  • Google AdMob Flutter SDK: optional advertising and consent services. An AdMob account and the buyer's own app/ad-unit IDs are required for monetization. Replace the supplied test IDs in branding/brand.yaml following the Ads chapter, or disable advertising there.
  • Google Fonts source repository: font families and their upstream license files. The corresponding font notices are also included in assets/fonts/.

Everything else

  • The app icon and launch-screen mark are drawn in code for this app (tool/branding/cut_mark.dart) and are part of your license.
  • Emoji stickers are drawn with the phone's own emoji font; no emoji images are included.
  • The 31 sound effects and 6 music tracks in assets/sounds/ were synthesized for this app (no recordings or third-party samples) and are part of your license: use them in the apps you build from Cutora. No demo videos are included. The screenshots in this guide show generated test patterns.
  • This guide uses Bricolage Grotesque and Inter (SIL OFL 1.1) and Roboto Mono (Apache-2.0). They are included in the guide's assets/fonts/ folder with their licenses.
Help and updates

Support & changelog

Need help?

Write to us through the Comments tab of the item page on CodeCanyon, or by e-mail to support@samidevstudio.com. Please tell us the step number, the exact error message, the output of flutter --version, and your phone model with its Android or iOS version.

Item support covers questions about the features in this guide and fixes for reported bugs. Custom changes are not included.

Changelog

1.1.1 2026-10-25

  • Initial release on CodeCanyon – the same version as Cutora on Google Play.